Melon Cooler/ Summer Cooler

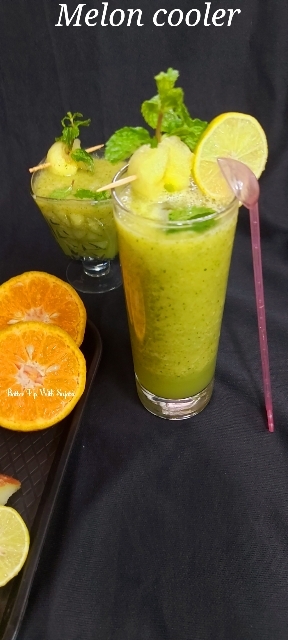
Melon cooler. Orange and mint flavoured honeydew melon or kharbuj drink taste heavenly. You don’t need any sweetener. This cooler will be naturally taste sweet. Freshly squeezed orange juice and mint made this fruity drink refreshing and delicious.

Try this thirst quenching chilled fruity drink to beat the heat. You may like to try some more summer cooler recipes from this blog. 1. Mixed fruit summer cooler

2. Fruit parfait

3. Orange grape frozen cooler

4. Watermelon cooler with Tulsi and Aloevera

5. Kiwi ginger lime cooler

6. Watermelon punch

And two more recipes with cantaloupe. Watermelon cantaloupe mint smoothie and Muskmelon orange coconut smoothie

You may also like to try a delicious summer cooler from the blog of Kalyani Sri.

Ingredients used to make this refreshing summer cooler.

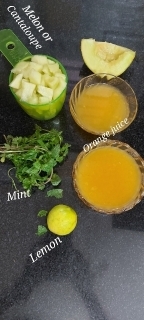
Honeydew melon or kharbuj – Used honeydew melon or kharbuj as main ingredient.

Honeydew melon, or honeymelon, is a fruit that belongs to the melon species cucumis melo (muskmelon). The sweet flesh of honeydew is typically light green, while its skin has a white-yellow tone. Its size and shape are similar to that of its relative, the cantaloupe. Honeydew melon is a sweet fruit that can be found around the world. Its flesh is light green, while its rind is typically white or yellow. Honeydew is full of vitamins, minerals and other health-promoting plant compounds. Eating this type of melon could have several health benefits, mainly due to its rich nutrient content. Source

Orange juice – Orange juice gives a sweetness and lovely flavour. I have used freshly squeezed orange juice. Orange juice is a favorite beverage high in antioxidants and micronutrients like vitamin C, folate, and potassium. Regular consumption has been associated with several health benefits, including improved heart health, decreased inflammation, and a reduced risk of kidney stones. Source- Healthline

Lemon – Used lemon juice to give the drink a tangy taste.

Mint leaves – Mint leaves used for flavour and it also gives a beautiful green colour.

Ice cubes – Ice cubes will make your drink chilled. You can also keep the glass in refrigerator for an hour to serve chilled.

Recipe is very simple and easy to make. Just combine everything and blend. Your chilled refreshing drink is ready. You can add little more lemon juice if you want your cooler more tangy. Enjoy the super yummy drink and keep yourself hydrated in this scorching hot weather.

Subscribe with your mail address to get all the recipes straight to your mailbox immediately after publishing.

Recipe

Honeydew melon/muskmelon/cantaloupe or kharbuj – 1 cup, chopped

Orange juice- 1 cup

Lemon juice- 2 tablespoon

Mint leaves- handful

Ice cubes as require

Method

1. Peel the honeydew melon or kharbuj and cut into half. Take out the seeds with a spoon. Discard the seeds and chop the melon into small pieces. I had lightly greenish honeydew melon but you can also use muskmelon or cantaloupe. Use whatever you have.

2. Wash the mint leaves well. Blend the chopped cantaloupe and mint leaves in a blender.

3. Add orange juice and lemon juice. Blend again till everything blend well. I have used freshly squeezed orange juice.

4. In a glass put some ice cubes. Pour the melon orange mixture over it. If you don’t want to use ice cubes, then keep the cooler in refrigerator for an hour and serve chilled.

5. Garnish with mint leaves and lemon wedges. Serve chilled or at room temperature. Enjoy…..

Stay safe healthy and keep yourself hydrated.

Get the video recipe here https://youtu.be/lyi7B2D47U4

If you tried my recipe, you can share your food pictures with me in the social network sites by using hashtag, #batterupwithsujata I would love to see your creations.

I would love to hear from you. Please share your thoughts and suggestions in comment.

Please visit my facebook page and hit the like button to get the latest update

Facebook page

Follow on

Twitter

Instagram

Pinterest

Almond Walnut Chutney With Mango Ginger Or Amada


Almond walnut chutney with mango ginger or amada. An easy to make, healthy and lipsmackingly delicious chutney flavored with mango ginger. Best accompany with your snacks or any meal.

Here are some more chutney or dip recipes from this blog.

1. Olive chutney with jaggery and panch phoran

2. Tomato chutney

3. Ginger chutney

4. Mango sesame chutney

5. Date raisins jaggery chutney with mango bar

6. Water chestnut or singhara chutney

7. Onion tomato chutney

8. Mango raisins chutney

9. Peanut chutney

10. Gur aam

11. Capsicum salsa


I have used amada or mango ginger in this chutney for flavour with almond, walnut, garlic, green chilli, cilantro or coriander leaves, lemon, tomatoes, sesame seeds, cumin and black pepper. Raw mango flavored amada or mango ginger looks like ginger but taste is different.

According to Wikipedia Mango-ginger is a popular spice and vegetable due to its rich flavor, which is described as sweet with subtle earthy floral and pepper overtones and similar to that of raw mango. It is a delicious addition to salads and stir fries. It is used in South Asian and Southeast Asian as well as Far East Asian cuisines.


Mango ginger or amada also have some health benefits.

1. Relieve pain. Mango ginger acts as a calming agent that provides relief from pain. 

2. Treat skin diseases. Curcuma manga is used for treating skin problems. It detoxifies the body and improves skin complexion, skin problems and acne.

3. Relieve Itching. The root is anti-allergenic and provides relief from itching. 

4. Metabolic problems. The plant helps to rectify the metabolic problems.

5. Relieve Cold and Cough. Mango ginger is an analgesic and expectorant which is often used to provide relief from cold and cough. It provides relief from bronchitis and asthma.

6. Relieve digestive problems. In human and animals, enterokinase found in Mango ginger assist digestion. The enzyme breaks down proteins to organic compounds which are easier to digest. Root also detoxifies the body. It provides relief from gas, promotes digestive strength and improves appetite.

7. Relieve inflammation. The anti-inflammatory properties prevent swelling in joints.

8. Relieve head lice and dandruff. Mango ginger has anti-fungal and antimicrobial properties.  To read more about mango ginger or amada click here.

Linking this recipe to Facebook gourmet group Shhhhh Cooking Secretly Challenge. In this monthly group members are paired with different partners every month and two secret ingredients are given to each other. We have to use these ingredients in our recipe. This chutney theme is suggested by Priya Vijaykrishnan who blog at Sweet Spicy Tasty. I have bookmarked her delicious Raw mango chutney to try. And this month my partner is Anu Kollon who blog at Ente Thattukada. Anu gave me walnut and sesame seeds as secret ingredients. I am sharing this healthy and absolutely delicious chutney using these ingredients. And I gave her tamarind and garlic. Let’s check out her delicious Peanut coriander chutney with these ingredients.

You have to dry roast sesame seeds or til, almond and walnut to make your chutney more delicious and flavorful. I have used roasted tomato. Roasted tomato will give a wonderful taste. You can increase or reduce the amount of green chilli and garlic according to your taste. You can also add ginger if you want.


Recipe

Tomato – 2, medium

Cilantro or coriander leaves – 1/2 cup

Walnut – 2 tablespoon, dry roasted

Almond – 2 tablespoon, dry roasted

Green chilli – 3 – 4 or to taste

Garlic – 2 – 3 cloves

Mango ginger or amada – 1 inch piece, grated

Cumin powder – 1/2 teaspoon

Black pepper powder – 1/2 teaspoon

Sesame seeds or til – 1 tablespoon, dry roasted

Lemon juice – 2 tablespoon or to taste

Salt to taste


Method

1. Rinse, pat dry and roast the tomatoes. Hold them with the help of a fork or knife on flame. Roast till the skin becomes black.


2. Dip roasted tomato in cold water. Peel the skin and chop them roughly.

3. Lightly dry roast almond, walnut and sesame seeds separately. Let everything cool down.

4. Peel the garlic cloves. Add all the ingredients in a grinder jar. Grind into a smooth paste. You can also add 1/2 teaspoon grated ginger if you want.

5. Taste and adjust salt and lemon juice if require. Take out the mixture in a glass bowl. You can drizzle 1 – 2 teaspoon olive oil. I didn’t.

6. Garnish with cilantro or coriander leaves and tomato slices. Serve with any snacks.

If you tried my recipe, you can share your food pictures with me in the social network sites by using hashtag, #batterupwithsujata I would love to see your creations.

I would love to hear from you. Please share your thoughts and suggestions in comment.

Please visit my facebook page and hit the like button to get the latest update

Facebook page

Follow on

Twitter

Instagram

Pinterest

Oats Whole Wheat Lemon Cookies With Olive Oil/ Eggless Cookies/ Butter Free Cookies

Oats whole wheat lemon cookies with olive oil. A delicious and vegan lemony cookies with all the goodness of oats whole wheat olive oil and lemon. Some of my readers asked on my Coffee cookies post if they can use oil instead of butter or ghee. So now a cookie without butter or ghee.

I have used olive oil but if you don’t have olive oil, use any flavorless vegetable oil or coconut oil. I have used little powdered sugar to sweetened the cookies. Next time I will try to share some cookies without sugar. Stay tuned. In these cookies 1/4 cup sugar and 1/8 cup desiccated coconut gave enough sweetness. You can also use powdered jaggery or stevia if you want. To make it gluten free use pearl millet flour/bajra atta, almond flour, coconut flour, cornmeal or any other gluten free flour of your choice. This recipe is completely dairy free. But if you want to make buttery cookies for kids then you can use butter instead of olive oil. You may like some more lemon flavored bakes on this blog. Click on the name below for recipe.

1. Lemon cake with kaffir lime

2. Oats cornmeal lemon crinkle cookies

3. Gluten free lemon cherry loaf cake

4. Lemon glazed water chestnut gulkand cake

5. Lemon chocolate marble cake

6. Lemon cake

This week 248 #Foodiemonday bloghop theme is Lemon Love suggested by Waagmi who blog at Cooking is fun. Waagmi is a very talented blogger. I always love her photography. Do visit her wonderful blog for many mouthwatering recipes. I have bookmarked her tongue tickling Katori chaat, Corn samosa and delicious Laddu kheer to try.

These soft cookies are absolutely easy to make yet superbly delicious. Bake for less time to get soft cookies or if you want crispy cookies bake for a few minutes more. You don’t need to grind the oats in this recipe. So here is an easy, delicious and healthy recipe to accompany your tea, coffee or milk. Or enjoy it in your munching time.

Recipe

Oats – 1/2 cup

Whole wheat flour or atta – 1/2 cup

Baking powder – 1 teaspoon

Desiccated coconut – 1/8 cup

Olive oil – 1/4 cup

Powdered sugar – 1/4 cup

Lemon juice – 3 teaspoon

Lemon zest – 1/2 teaspoon

Vanilla essence – 1/2 teaspoon

Curd – 2 & 1/2 teaspoon

Method

1. Preheat the oven at 180° for 10 minutes. Grease or line a baking sheet with parchment paper.

2.   In a bowl mix whole wheat flour or atta, oats, baking powder and desiccated coconut.

3. In a large bowl whisk olive oil and powdered sugar till sugar dissolved.

4. Now add lemon juice, lemon zest, vanilla essence and curd. Whisk again.

5. Add all the dry ingredients, mix and make a soft dough. Don’t knead much. Take a tablespoon of dough and make round balls with your palm. Press the balls with your palm and arrange on lined or greased baking sheet 1 inch apart.

6. Press all the cookies with a fork. I have made 13 cookies.

6. Bake in preheated oven at 180° for 15 to 20 minutes or till edges becomes golden brown. For soft cookies don’t over bake. Every oven take different time. Check after 12 minutes. If you want your cookies crisp bake for 3 – 4 minutes more.

7. Let the cookies cool down completely. Serve with tea, coffee, milk or store in airtight container for later.

Notes

1. Coconut flour, almond flour, millet flour, cornmeal or any gluten free four can be used instead of whole wheat flour or atta.

2. Any flavorless vegetable oil can be used instead of olive oil.

3. You can also use butter or ghee instead of oil.

If you tried my recipe, you can share your food pictures with me in the social network sites by using hashtag, #batterupwithsujata I would love to see your creations.

I would love to hear from you. Please share your thoughts and suggestions in comment.

Please visit my facebook page and hit the like button to get the latest update

Facebook page

Follow on

Twitter

Instagram

Pinterest

Chana Or Chickpea Chaat With Raw Mango

Chickpeas/garbanzo beans or chana chaat with raw mango. An easy and quick yet lipsmacking dish. Spicy tangy in one word chatpata chaat is everyone’s favourite. If you have boiled chickpeas ready then its a completely no cook recipe. So perfect for summer days. You don’t need to spend much time in kitchen.

You can also use leftover boiled chickpeas to make this chaat. Finely chopped onion,tomato, green chilli, cilantro, grated raw mango and some spices made simple boiled chickpeas lipsmackingly delicious.

Bhaja moshla or roasted and powdered spices will enhance the taste but if you don’t have it you can skip or use dry roasted and powdered cumin. Earlier I have shared Ghugni and aloo kabli chaat and Matar chaat .

Nutritious chickpeas have many health benefits. Chickpeas, also known as garbanzo beans, are part of the legume family. As a rich source of vitamins, minerals and fiber, chickpeas may offer a variety of health benefits, such as improving digestion, aiding weight management and reducing the risk of several diseases. Additionally, chickpeas are high in protein and make an excellent replacement for meat in vegetarian and vegan diets. Including chickpeas in your diet regularly will support your health and may reduce your risk of developing chronic diseases, such as heart disease and cancer. Source – Healthline

Here are some more chickpeas recipes on this blog. Click on the name below for recipe.

1. Peas chickpeas low calorie salad

2. Chickpea potato dry sabji

3. Tomato coconut chickpea curry

4. Chana madra

5. Falafel

6. Pumpkin stir fry with chickpeas

7. Mint carrot beetroot hummus

And some black chickpeas recipe

1. Paneer kala chana kofta curry

2. Kadala curry or black chickpea curry

3. Kala chana Kabab

Sending this post to 247 #Foodiemonday bloghop theme is Chaat Time suggested by Swaty Malik who blog at Food Trails. Swaty has a lovely blog with many mouthwatering recipes. I always love her healthy and delicious recipes. With many other authentic and innovative recipes you will love her baking collection with many wonderful baked dishes. To get her baking collection click here and I also love her Moradabadi dal chaat, I will try it soon.

To make this delicious and quick chana chaat you have to boil chickpeas only. Then mix all the ingredients with chickpeas and enjoy the spicy tangy and mouthwatering chana chaat. Just finely chop onion, tomato, cilantro, green chilli, grated raw mango or kachcha aam and some spices. You can also add more lemon juice and grated raw mango if you want your chaat more tangy.

Recipe

Chickpeas/garbanzo beans or kabli chana – 1 cup

Salt – 1 teaspoon

Water – 2 cup

Onion – 1, finely chopped

Tomato – chopped

Ginger julienne – 1 tablespoon, optional

Green chilli – 1 – 2 or to taste, finely chopped

Cilantro or coriander leaves – 1 tablespoon, chopped

Grated raw mango ar kachcha aam – 1 tablespoon

Lemon juice – 3 teaspoon

Chaat masala – 1 teaspoon

Cumin or jeera powder – 1 teaspoon

Freshly crushed black pepper – 1/2 teaspoon

Bhaja moshla – 1 teaspoon, optional

Black or pink salt – 1 teaspoon

Kashmiri red chilli powder – 1/2 teaspoon,optional

Method

1. Rinse and soak chickpeas in sufficient water overnight.

2. Boil in pressure cooker with 1 teaspoon salt and 2 cup water. When hissing sound starts reduce the heat. Cook on simmer for 30 – 40 minutes. Let the pressure settle down on it’s own. Chickpeas should be becomes soft. Check by pressing with your finger tips.

3. Let the chickpeas cool down. Add all the remaining ingredients in chickpeas. You can also add chopped mint leaves if you want. Bhaja moshla is optional or you can use dry roasted and powdered cumin but I recommend to use it to make the chaat spicy and flavorful. And it will enhance the taste. Get the bhaja moshla or roasted spice powder recipe here .

4. Taste and add more salt and lemon juice if require. You can also add 1 tablespoon more grated mango if you like your chaat tangy. See notes for more options.

5. Garnish with lemon wedges, cilantro or coriander and ginger julienne. You can serve with green chutney or tamarind chutney. I didn’t. Enjoy the spicy and lipsmacking chhana chaat.

Notes

1. You can use grated ginger instead of ginger julienne or you can also skip ginger if you don’t like.

2. Chopped cucumber or boiled or roasted beetroot, boiled potatoes can be used in this chaat. Or you can also use grated raw beetroot.

3. Add chilli according to your taste. For garnishing you can use pomegranate arils, nylon sev etc.

If you tried my recipe, you can share your food pictures with me in the social network sites by using hashtag, #batterupwithsujata I would love to see your creations.

I would love to hear from you. Please share your thoughts and suggestions in comment.

Please visit my facebook page and hit the like button to get the latest update

Facebook page

Follow on

Twitter

Instagram

Pinterest

Corn Peas Barista Fried Rice Or Pulao

Corn peas barista fried rice or pulao. If you have rice and barista or fried onions ready then you can make it in a jiffy. A perfect rice dish for your party. Just prepare the rice and barista earlier. You can keep both in refrigerator. Fry and combine everything before serving. Easy isn’t it?

You may like some more rice recipes on this blog.

1. Korean rice or egg fried rice

2. Aloo chutney pulao

3. Spanish moulded rice

4. Mint rice or pulao

5. Beetroot rice

6. Mexican rice

7. Carrot rice

8. Tricolour rice

9. Mexican green rice

This week 240 #Foodiemonday bloghop theme is Cooking With Rice suggested by Narmadha who blog at Nams Corner. Narmadha has a wonderful blog with many mouthwatering recipes. I recently bookmarked her Chicken fry and Gluten free brownie recipe to try. Do visit her space for different types of delicious recipes.

Usually we store some frozen peas and corn in freezer. And I also keep some fried onions and barista in refrigerator. So if you don’t have much vegetables in your pantry then these stored ingredients comes handy. Make delicious rice with whole spices, barista, frozen sweet corn and green peas and enjoy. Serve it with any non veg curry or any spicy curry or simple raita. I have served it with Dum aloo.

Recipe

Sweet corn – 1 cup, boiled

Frozen peas – 1/2 cup

Onion – 3, thinly sliced

Basmati rice – 1 & 1/2 cup

Bay leaf – 2

Green cardamom – 3

Cinnamon – 1 inch piece

Cloves – 3

Star anise – 1, optional

Mace or javitri – 2 strand

Lemon juice – 1 teaspoon

Ghee or clarified butter – 2 tablespoons

Water – 2 cup

Salt to taste

Cumin seeds – 1 teaspoon

Oil – 1 tablespoons + to fry the onions

Method

1. Wash the rice well. Soak in water for 15 minutes.

2. Drain and add salt, bay leaf, cardamom, cinnamon, cloves, star anise, lemon juice, 1 tablespoon ghee or clarified butter and 2 cup water. Pressure cook for 1 whistle or microwave for 10 – 12 minute. Fluff the rice gently and discard the bay leaf. Rice shouldn’t be over cooked.

3. Fry the sliced onions till brown to make barista and keep aside.

4. In a pan heat 1 tablespoon oil and 1 tablespoon ghee. You can skip oil and use 2 tablespoon ghee if you like. Add cumin seeds.

5. When seeds starts to splutter add frozen peas and boiled sweet corn. Add little salt and fry for 2 minutes.

6. Add the rice and fried onion slices. Reserve little barista to garnish. Mix well. Taste and adjust salt if require. Mix gently, rice shouldn’t be break.

7. When everything combines well remove from heat. Garnish with barista or fried onion slices. Serve hot with any mutton or chicken curry or any spicy gravy. Or you can enjoy this aromatic rice with raita only.

Notes

1.You can use green chilli if you want. Add chopped green chilli after adding cumin seeds.

2. Be careful while making rice. Rice shouldn’t be mushy.

If you tried my recipe, you can share your food pictures with me in the social network sites by using hashtag, #batterupwithsujata I would love to see your creations.

I would love to hear from you. Please share your thoughts and suggestions in comment.

Please visit my facebook page and hit the like button to get the latest update Facebook page

Follow on

Twitter

Instagram

Pinterest

Hariyali Chicken/Dhania Chicken/ No Oil Chicken/Microwave Chicken

Hariyali chicken or dhania/coriander chicken cooked in microwave. Also sharing the method to cook on stove top. A zero oil recipe. You don’t need to add any oil yet taste is absolutely delicious.

You don’t have to saute or fry the spices and chicken. Grind and make a paste of cilantro or coriander, tomato etc, marinate the chicken with ground paste along with salt, lemon juice and some spices and cook. A super easy as well as healthy recipe. No oil or butter required. Absolutely oil free chicken curry. To get some more chicken recipes click on the name below.

1. Sikkimese chicken curry

2. Chicken kosha with whole garlic and potato

3. Zafrani chicken

4. Chicken dak bungalow

5. Chicken clear soup

6. Chicken chaap

Monday again and this week’s 238 #Foodiemonday bloghop theme is #GoGreen suggested by Aruna SarasChandra who blog at Vasusvegkitchen. Aruna has a wonderful blog with different types of delicious recipes like Paneer pinwheel, Bengal style vegetable chop etc. Do visit her space for many other mouthwatering recipes.

You can cook this chicken in microwave and stove top both. I made it in microwave. You don’t need to fry or saute the spices or chicken at all. Just marinate the chicken and cook. Even no oil or butter required to make it. Easy isn’t it? If you want your chicken spicy add more green chilli or if you are making for kids reduce the amount of green chilli.

Recipe

Chicken – 800 gram

Onion – 1 medium, chopped

Tomato – 1 medium, chopped

Cilantro or coriander leaves – 2 cup tightly packed, chopped

Ginger – 1 & 1/2 inch piece, chopped

Garlic – 6 – 7 cloves

Green chilli – 4 – 5 or to taste

Cumin powder – 1 & 1/2 teaspoon

Coriander powder – 1 teaspoon

Turmeric powder – 1/4 teaspoon

Garam masala powder – 1/2 teaspoon

Salt to taste

Lemon juice – 3 tablespoon

Yogurt – 2 tablespoon

Method

1. Clean and rinse the chicken pieces well. Mix salt and lemon juice.

2. Grind tomato, onion, green chilli, cilantro or coriander leaves and garlic altogether. Make a smooth paste.

3. Marinate the lemon juice and salt mixed chicken pieces with ground mixture, cumin powder, coriander powder, turmeric powder, garam masala powder and yogurt. Mix well. Cover and keep aside for 15 – 30 minutes. You can keep it overnight in refrigerator.

4. Microwave on high power for 10 minutes. Don’t add water. After 10 minutes stir well and check with a fork. If chicken becomes soft, cover again and serve after 3 – 4 minutes. And if require cook on high power for 4 – 5 minute more. Its depends on chicken. 500 gram chicken takes 10 minutes to cook. It may take 5 to 10 minutes more over 500 gram chicken.

5. For stove top cook marinated chicken on low medium heat in covered pan. Stir in between. Cook till chicken becomes soft. No need to add water.

6. Serve hot with steamed rice, fried rice, pulao, roti, naan, paratha, puri or any bread.

Notes

1. Add green chilli according to your taste.

2. You can use more garlic if you want.

If you tried my recipe, you can share your food pictures with me in the social network sites by using hashtag, #batterupwithsujata I would love to see your creations.

I would love to hear from you. Please share your thoughts and suggestions in comment.

Please visit my facebook page and hit the like button to get the latest update Facebook page

Follow on Twitter

Instagram

Pinterest

Gluten Free Oats Cornmeal Lemon Crinkle Cookies

Gluten free eggless oats cornmeal lemon crinkle cookies.
Delicious lemon flavoured crispy outside and fudgy inside cookies made with cornmeal or makke ka atta, oats and lemon.

I have made it with gluten free flour but you can use whole wheat flour or refined flour or any flour of your choice. I didn’t want to use colour so used cornmeal. Cornmeal will give a beautiful light yellow colour to your cookies. But if you are using whole wheat flour or refined flour then you have to use little yellow food colour or you can keep your cookies simply white. Taste will be equally delicious.
I always try to bake with gluten free flour because some of my readers are suffering with gluten intolerance. But everyone can enjoy it. These cookies are hot favourite among my family and friends.
You may like some more gluten free cookies on this blog.

1. Oats almond cranberry cornmeal cookies

2. Fennel oats millet cookies

3. Pearl millet cashew almond honey cookies

4. Rose flavoured shortbread cookies

5. Pearl millet sesame oats cookies

And one more crinkle cookies.

Finger millet or ragi chocolate crinkle cookies

Monday again and this week 208 #Foodiemonday bloghop theme is #Meethebandhan suggested by Archana Gunjikar Potdar who blog at The Mad Scientists Kitchen. Archana have a vast collection of healthy and delicious recipes. I have already bookmarked her honey cake. Do visit her space for amazing recipes from different cuisine. I am sure you will love her recipes.

You can use butter or ghee/clarified butter, whatever you want. I have tried both. If you like the flavour of ghee or clarified butter, then make it with ghee. I love the taste of ghee cookies. Cornmeal will give a beautiful light yellow colour to your cookies.

Recipe

Oats powder – 1 cup

Cornmeal or makke ka atta – 1/3 cup + 1 tablespoon

Baking powder – 1 teaspoon

Baking soda – 1/4 teaspoon

Powdered sugar – 1/2 cup

Butter or ghee/clarified butter – 1/4 cup

Curd – 3 tablespoon

Lemon juice – 1 tablespoon

Lemon zest – 1/2 teaspoon

Powdered sugar for coating

Method

1. Preheat the oven at 180°.

2. Grease or line a baking sheet with parchment paper.

3. In a bowl sift oats powder, cornmeal or makke ka atta, baking powder and baking soda.

4. In a large bowl cream ghee or butter, and powdered sugar. Whisk well.

5. Add lemon juice, lemon zest and curd. Mix well.

6. Now add the dry ingredients. Mix and make a smooth dough. Dough will be sticky. Keep the dough in refrigerator for 30 minutes.

7. Spread powdered sugar on a plate.

8. Take out the dough and make small balls.

9. Roll the balls in the powdered sugar. Press gently. Powdered sugar should be coated well all over the cookies.

10. Bake in preheated oven at 180° for 10 – 12 minutes. For fudgy inside cookies don’t over bake.
If you want crisp cookies bake for 1 – 2 minutes more.

11. Let the cookies cool down completely before serving.
Enjoy the divine taste. You can store the cookies in a airtight container.

Notes
1. Whole wheat or refined flour or any flour can be used instead of cornmeal and oats.
2. Don’t skip to refrigerat the dough.

If you tried my recipe, you can share your food pictures with me in the social network sites by using hash tag, #batterupwithsujata
I would love to see your creations.

I would love to hear from you. Please share your thoughts and suggestions in comment.
Please visit my facebook page and hit the like button to get the latest update
Facebook page
Follow on
Twitter

Instagram

Pinterest

Watermelon Punch

Watermelon punch.
Here is a chilled and refreshing drink to beat the heat. A delicious drink with all the goodness of watermelon, orange and lemon. You don’t need any sweetener because watermelon and orange have enough sweetness.

Juicy and sweet watermelon not only low calorie, refreshing and delicious but its also rich in vitamins and many healthy plant compounds.
Here are the top 9 health benefits of eating watermelon. Helps You Hydrate. Contains Nutrients and Beneficial Plant Compounds. Contains Compounds That May Help Prevent Cancer. May Improve Heart Health. May Lower Inflammation and Oxidative Stress. May Help Prevent Macular Degeneration. May Help Relieve Muscle Soreness.
Watermelon is a surprisingly healthy fruit. It has a high water content and also delivers many other important nutrients, including lycopene and vitamin C.
These nutrients mean that watermelon isn’t only a tasty low-calorie treat — it’s also very good for your health.

Source

You may like some more watermelon recipes on this blog.

1. Watermelon salsa

2. Watermelon rasgulla

3. Watermelon cantaloupe mint smoothie

4. Watermelon sandesh

5. Watermelon muffins

6. Virgin watermelon mojito

7. Mocktail with watermelon

8. Litchi watermelon date peach Tulsi and almond smoothie

9. Watermelon cooler with tulsi and Aloe Vera

This fruit punch is very easy to make. Just combine all the juice and add some ice cubes, lemon slices and watermelon scoop. Enjoy the chilled, refreshing and delicious drink.

Recipe

Watermelon – 4 cup, cubed and seedless

Orange juice – 1 cup

Lemon juice – 2 teaspoon

Ice cube as require

Watermelon scoop and lemon slices to garnish

Method

1. Blend the watermelon cubes in blender or use your juicer to make juice.

2. Strain the juice with a strainer.

3. Mix orange juice and lemon juice.

4. In a glass place some ice cubes, lemon slices and watermelon scoop.

5. Pour the watermelon orange and lemon juice over it.
Serve immediately.

If you tried my recipe, you can share your food pictures with me in the social network sites by using hash tag, #batterupwithsujata
I would love to see your creations.

I would love to hear from you. Please share your thoughts and suggestions in comment.
Please visit my facebook page and hit the like button to get the latest update
Facebook page
Follow on
Twitter
Instagram
Pinterest

Watermelon Salsa

Watermelon salsa.
Here is a healthy and quick recipe for my 400 post. Thanks everyone for your love and support.

Watermelon salsa is a perfect appetizer for summer. Very easy and quick to make. Just combine everything. Refrigerate for few minutes and enjoy. If you have mango, strawberry or any other fruit then you can add them in this salsa. Use the fruits according to your choice. Bowl full of this salsa is refreshing, filling, healthy and delicious. And also great for weight watchers. You can get one more fruit salsa here.

Loaded with vitamins, minerals and nutrients, watermelon is one fruit you should not miss this hot season.
own as a body-healing fruit, watermelon is full of amazing health benefits, especially during the summer season. Because clearly, it is the best time to indulge in this fresh, succulent melon, as it has to offer an array of nutrients, vitamins and minerals. The fruit is incredibly hydrating, with up to 92 per cent water content, making it naturally low in fat.

If you eat watermelon on a daily basis, it can improve your cardiovascular health and protect your eyes and immune system.
Source

You may like some more watermelon recipes on this blog.

1. Watermelon rasgulla

2. Watermelon cantaloupe mint smoothie

3. Watermelon sandesh

4. Watermelon muffins

5. Virgin watermelon mojito

6. Mocktail with watermelon and Fanta

7. litchi watermelon date peach Tulsi and almond smoothie

8. Watermelon cooler with Tulsi and Aloe Vera

Our this week’s 194 #Foodiemonday bloghop theme is Summer fruit fest suggested by Swaty Malik who blog at
foodtrails.
Do visit her space for some wonderful recipes she shared.

I have used boiled sweet corn, cucumber and tomato in this salsa. You can use red and yellow bell pepper, mango, pineapple, strawberry or any fruit of your choice.

Recipe

Watermelon – 2 cup, scooped or cubed

Sweet corn – 1/2 cup, boiled

Cilantro or coriander leaves – 2 tablespoon, chopped

Green chilli – 1 finely chopped

Cucumber – 1, peeled and cubed

Tomato – 1 cubed

Red onion – 1, chopped

Freshly crushed black pepper – to taste

Dried mint leaves – 2 tablespoon, crushed

Or

Fresh mint leaves – 2 tablespoon, chopped

Orange juice – 1/4 cup

Lemon juice – 1 tablespoon

Rock salt or black pepper – to taste

Method

1. Combine everything in a glass bowl. Mix gently.

2. I have used dried mint leaves. If you are using dried mint leaves like me then crush the dried leaves with your both palm and mix.

3. Garnish with cilantro or coriander leaves or mint leaves.

4. Refrigerate for 30 minutes and serve with tortilla chips or papad. Or enjoy bowl full as appetizer.

Notes

1. You can use jalapeño, red and yellow bell pepper, mango, strawberry, pineapple, fresh coconut pieces or any fruit of your choice.
2. Add chilli and black pepper according to your taste.

If you tried my recipe, you can share your food pictures with me in the social network sites by using hash tag, #batterupwithsujata
I would love to see your creations.

I would love to hear from you. Please share your thoughts and suggestions in comment.
Please visit my facebook page and hit the like button to get the latest update
Facebook page
Follow on

Twitter

Instagram

Pinterest

Red Lentil Soup

Red lentil soup.
A delicious comforting and flavourful soup. Very easy to make and nutritious. Serve it as a comforting meal with a dash of lemon juice or serve it with rice or bread.

Earlier made a Lebanese lentil soup with whole red lentils and loved the taste so tried this with red lentils. Its equally delicious.

You may like some more lentil recipes in this blog.

Lebanese Lentil Lemon Soup

Beetroot dal or lentil curry

Whole Masoor dal or brown or red lentils

Red lentil fritters in sour gravy

Red lentils, also known as Masoor dal, are an extremely popular lentil in India. They are grown all over the country and consumed for their various health benefits. Red lentils are extremely good for your skin and can prevent issues like rapid ageing and acne. They can also be used to lighten the skin and get rid of tans. Red lentils promote weight loss and are very good for your digestion due to the high amounts of fiber present in this lentil. It is good for diabetics as it regulates the random spikes and drops in the glucose level in the blood. It is abundantly rich in proteins and minerals, which help boost various systems in your body. It is very good for your bones, teeth, and eyesight because of this. It can reduce the risk of cancer due to its anticancer properties and is known for reducing bowel, colon, lung, and breast cancer risks. Moreover, due to its high antioxidant content, it is very beneficial for your immune system and can help prevent a ton of diseases and infections.
Read more about red lentil here.

This lemon flavoured lentil soup is very easy to make. You can use your pressure cooker to make it. But better to cook in open pot for taste. Soup will be more tasty if you will cook it in open pot.

Recipe

Red lentils or Masoor dal – 1 cup

Carrot – 2 medium

Potato – 1, optional

Onion – 1, finely chopped

Bay leaf – 1

Garlic – 3 – 4, minced

Ginger – 1 inch piece, grated

Tomato – 1, chopped

Baby spinach – 100 gram, chopped

Cilantro or coriander leaves – handful, chopped

Cumin powder – 1 teaspoon

Turmeric powder – 1/2 cup

Dried mint leaves – 3 tablespoon, crushed

Black pepper powder – 1 teaspoon or to taste

Salt to taste

Oil – 2 tablespoon

Water – 5 cup

Lemon juice – 2 teaspoon

Zest of 1 lemon

Method

1. Peel and cut the carrot and potato in cubes.

2. Rinse and chop the spinach.

3. Heat oil in a pan or wok. Add onion and garlic. Fry till the onion becomes translucent.

4. Add grated ginger, carrot, and potato. Saute for 2 minutes.

5. Now add spinach and tomato. Saute for 2 – 3 minutes or till the tomato becomes soft.

6. Add lentils, salt, cumin powder and black pepper powder. Mix well.

7. Add water and crushed dried mint leaves. Let it boil.

8. When it starts to rolling boil reduce the heat. Cook on low heat till lentils becomes soft. It will take 25 – 30 minutes. Don’t cover the pan.

9. When lentils becomes soft add lemon zest and lemon juice. You can add more water if require.

10. Remove from heat. Taste and adjust the seasoning. Add more lemon juice if require.

11. Garnish with mint and coriander leaves, lemon wedges and chopped tomatoes or fresh red chilli. I have used small pieces of fresh red chilli.

If you tried my recipe, you can share your food pictures with me in the social network sites by using hash tag, #batterupwithsujata
I would love to see your creations.

I would love to hear from you. Please share your thoughts and suggestions in comment.
Please visit my facebook page and hit the like button to get the latest update
Facebook page
Follow on
Twitter

Instagram

https://in.pinterest.com/sujataroy1291