Strawberry Yogurt

Strawberry yogurt. Thick yogurt with cooked strawberries and a hint of lemon taste divine. This delectable strawberry yogurt is also perfect for fasting days. So try this strawberry flavoured yogurt on upcoming Navaratri.

You need only a few ingredients to make this heavenly dessert.

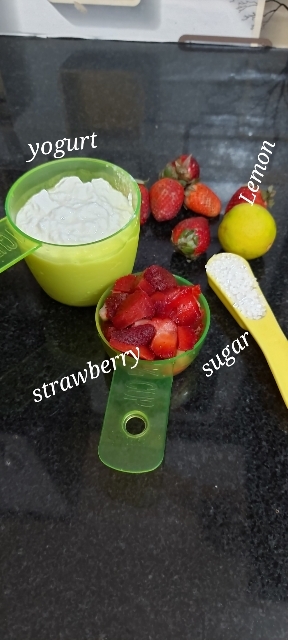
Strawberry – Strawberry cooked with little sugar made this yogurt smooth and delectable.

Sugar – My strawberry is tangy so I had to use 2 tablespoon sugar but if you have sweet strawberries use less sugar. Taste the strawberry before using.

Lemon juice – Hint of lemon enhance the taste and flavour.

Lemon zest – Little lemon zest also enhance the flavour. But you can skip if you want.

You can get many savoury recipes with yogurt on this blog. Type yogurt on the search bar to get the recipes. Here are some sweet recipes with yogurt. Click on the name below to get the recipe.

1. Bhapa doi or steamed yogurt

2. Mint orange lassi

3. Mango pomegranate overnight oats parfait

4. Misti doi

5. Banana almond mint smoothie

6. Misti doi parfait

7. Guava banana smoothie

As I mentioned above that you need only a few ingredients to make this delicious strawberry flavoured yogurt. And recipe is also very easy. You have to cook the strawberry with sugar only for a few minutes on low flame. Let it cool down. Whisk the yogurt or curd well and add cooked strawberries and whisk again. Refrigerate for 30 minutes if you want your strawberry yogurt chilled. If you have sweet variety strawberries add less sugar. Use sugar according to your taste. My strawberries are sour so two tablespoon is perfect for me.

Subscribe with your mail address to get all the recipes straight to your mailbox immediately after publishing.

Recipe

Thick yogurt or hung curd – 3/4 cup

Strawberry – 1/3 cup, chopped

Sugar – 2 tablespoon

Lemon juice – 1/2 teaspoon

Lemon zest – 1/8 teaspoon

Method

1. Rinse and chop the strawberries. In a pan heat chopped strawberries and sugar. You can chop the strawberries into small pieces. My strawberries are little tangy so used 2 tablespoon sugar. If your strawberries are too sweet use 1 to 1&1/ tablespoon sugar or add sugar according to your taste.

2. Cook the strawberries on low heat till strawberries becomes mushy. Keep stirring. Add lemon juice and lemon zest and mix. Remove from heat and let it cool down.

3. In the meantime whisk the thick or hung curd with a wire whisker. Don’t use watery curd or yogurt. Whisk till thick curd or yogurt becomes smooth. Add strawberry, sugar and lemon mixture and whisk again. Strawberry mixture should be cool down completely.

4. Transfer the strawberry yogurt in your favourite bowl. Garnish with chopped strawberries and serve chilled. Refrigerate for 30 minutes before serving. Enjoy……

If you tried my recipe, you can share your food pictures with me in the social network sites by using hashtag, #batterupwithsujata I would love to see your creations.

I would love to hear from you. Please share your thoughts and suggestions in comment.

Please visit my facebook page and hit the like button to get the latest update

Facebook page

Follow on

Twitter

Instagram

Pinterest

Cauliflower In Microwave Or Bhapa Fulkopi/Steamed Cauliflower

Cauliflower in microwave or Fulkopi bhapa. A very easy to make yet lipsmackingly delicious no onion garlic curry made with lightly fried cauliflower, fresh coconut and some spices. Just mix everything and microwave for 10 minutes. A perfect side dish to serve with steamed rice. 

Here are some sweet and savoury microwave recipes from this blog. 

1. Steamed sandesh with date palm jaggery

2. Bhapa doi or steamed yogurt

3. Green moong idli

4. Cornmeal oats soya vegetable idli

5. Microwave chicken

6. Hariyali chicken

7. Microwave mushroom

8. Microwave chivra

You may also like to try a wonderful Microwave recipe from the blog of my friend Sasmita.

This Fulkopi bhapa or steamed cauliflower is very easy to make. Just marinate everything and microwave for 10 minutes. A delicious side dish without any mess. If you don’t have microwave, then you can also make it on stove top. Place the marinated cauliflower in a covered container and steam. To steam on stove top heat water in a pot or steamer basket. Place the covered container with marinated cauliflower over the pot and steam.  For me microwave cooking is much easy and hassle free. 

Subscribe with your mail address to get all the recipes straight to your mailbox immediately after publishing.

Recipe

Cauliflower- 1

Mustard powder- 1&1/2 tablespoon 

Poppy seeds or khas khas- 2&1/2 tablespoon

Kashmiri red chilli powder- 1&1/2 teaspoon

Turmeric powder- 1/2 teaspoon 

Green chilli- 2-3 or to taste 

Coconut- 2 tablespoon 

Salt to taste 

Mustard oil- 3 teaspoon 

Curd or yogurt – 1/4 cup

Water-1 cup + 3 tablespoon to soak Mustard powder, turmeric powder and Kashmiri red chilli powder. And   3-4 tablespoon to grind the spices

Method

1. Cut the cauliflower into medium size florets. Rinse and drain the water. 

2. Soak mustard powder in 3 tablespoon water. Add turmeric powder and Kashmiri red chilli powder with mustard powder mix well. 

3. Heat 2 tablespoon mustard oil in a pan. Add cauliflower florets and fry till cauliflower florets becomes light brown. Remove from heat and keep aside. 

4. Grind the poppy seeds or khas khas into fine powder. You can also soak the poppy seeds in hot water and grind to make smooth paste when cool.  After grinding the poppy seeds add chopped green chilli and grated coconut and grind altogether with 2-3 tablespoon water. Add green chilli more or less according to your taste. Make a smooth paste of poppy seeds, green chilli and coconut. You can use 1-2 tablespoon more water to grind if require.

5. Now add curd or yogurt and blend with the paste. You can whisk the curd separately if you want. Curd should be blend really well. 

6. In a microwavable glass bowl pour the ground paste with curd, soaked mustard powder with turmeric and Kashmiri red chilli powder and salt. Mix everything well. 

7. Add fried cauliflower and mix again. Add 1-2 tablespoon mustard oil and 2 tablespoon chopped cilantro or coriander leaves. You can also add 2-3 slit green chili. 

8. Cover the bowl loosely and microwave on high power for 10 minutes.  Switch off the oven and keep it in microwave for 5-6 minutes. 

9. After 5-6 minutes take out the cauliflower from oven and garnish with cilantro or coriander leaves. Serve hot with steamed rice. 

If you tried my recipe, you can share your food pictures with me in the social network sites by using hashtag, #batterupwithsujata I would love to see your creations.

I would love to hear from you. Please share your thoughts and suggestions in comment. 

Please visit my facebook page and hit the like button to get the latest update

  Facebook page

Follow on

  Twitter

Instagram

Pinterest

Moong Dal Chilla/Gluten Free Savoury Pancake

Split green moong dal chilla/cheela or savoury pancake. A very easy to make and delicious filling breakfast dish. You need only a few ingredients to make these chilla/chila/cheela or savoury pancakes. Ginger green chilli and all the spices made these gluten free cheela absolutely mouthwatering.

Not only delicious but these green gram pancakes are nutritious too. So here is a super healthy breakfast to start your day. You can also add any vegetable in the batter to make it more nutritious.

They’re high in nutrients and believed to aid many ailments. Mung beans are high in nutrients and antioxidants, which may provide health benefits. In fact, they may protect against heat stroke, aid digestive health, promote weight loss and lower “bad” LDL cholesterol, blood pressure and blood sugar levels. Since mung beans are healthy, delicious and versatile, consider incorporating them into your diet. Source

Here are some more savoury pancake or chilla recipes from this blog.

Savoury pancakes with bottle gourd and carrot

Multigrain cheese stuffed pancakes

Green moong uttapam

Sprouts semolina pancake

Oats semolina pancake

You may also like to try delicious Cucumber pancakes from the blog of Priya Vijaykrishnan.

Recipe is very simple. You have to grind the soaked dal or yellow lentil with ginger and green chilli and mix all the ingredients. Its a completely gluten free recipe. Used rice flour with ground lentil to make the pancakes crispy. If you want your pancakes soft make it little thick but to make this crisp make it as thin as possible and fry on low heat. It will take some time but you will get crisp chilla/cheela or pancakes. Add spices and chilli according to your taste. You can also make a stuffing of paneer, potato, cheese etc. Place the stuffing on the pancake and roll. Your stuffed pancake is ready.

Subscribe with your mail address to get all the recipes straight to your mailbox immediately after publishing.

Recipe

Split green moong dal or yellow lentil with skin – 1 cup

Rice flour – 3/4 cup

Curd or yogurt – 1/2 cup

Ginger – 1&1/2 inch piece, peeled and chopped

Green chilli – 3-4 chopped

Onion – 3 large

Cilantro or coriander leaves – handful, chopped

Cumin powder – 1&1/2 teaspoon

Chaat masala – 1&1/2 teaspoon

Salt – 2 teaspoon

Black pepper powder – 1/2 teaspoon

Method

1. Rinse and soak the split and with skin yellow lentil or chhike wali moong dal for 4-5 hours or overnight. I soaked overnight.

2. Drain the water and rinse again. Grind the dal or lentil with ginger, green chilli and 1/4 cup water. Make a smooth paste. You can add more green chilli to make your chilla more spicy. I like the flavour of ginger so used 1&1/2 inch piece but you can use one inch piece if you want.

3. Chop the onions and cilantro or coriander leaves. Chop into small pieces. My son loves lots of onions in this chilla or pancake so I used 3 large onions. You can use less or more according to your taste.

4. Transfer the ground paste into a large bowl. Add curd or yogurt, rice flour, cumin powder, black pepper powder, chaat masala and salt. Mix everything well to make a lump free batter.

5. Taste and adjust salt if required. I had to add 1/2 teaspoon more. You can also use some finely chopped green chilli and little more black pepper powder if you want your chila or cheela more spicy Add finely chopped onion and cilantro or coriander leaves.

6. Mix well. Batter should be thick and flowing. Don’t make runny batter.

7. Heat a pan and add two laddle full batter in the middle of the pan. Spread with the backside of the laddle. Rotate to make round. Keep the flame low medium. Drizzle little oil on the sides of chilla.

8. To make soft cheela make it thick like uttapam but if you want crisp make the chilla thin and cook on simmer. When it starts to leaving the edges of the pan, flip the chilla upside down and let it cook from other side.

9. Cook from both sides till golden brown. You can also fold the pancakes before serving like this 👇

10. Serve hot with any sauce, pickle or raita.

Notes

1. You can add grated carrot, chopped capsicum or any vegetable of your choice in the batter.

2. Use chilli according to your spice tolerance. Reduce if making for kids.

3. Olive oil or any vegetable oil can be used to cook.

4. You can use any spices according to your taste.

5. You can also make it without onion if you want.

If you tried my recipe, you can share your food pictures with me in the social network sites by using hashtag, #batterupwithsujata I would love to see your creations.

I would love to hear from you. Please share your thoughts and suggestions in comment.

Please visit my facebook page and hit the like button to get the latest update

Facebook page

Follow on

Twitter

Instagram

Pinterest

Cheesy Rice Ball

Cheesy rice balls. A delicious cheese stuffed rice balls with Italian herbs made with leftover rice. Its a kids friendly dish but adults will also love the taste of these balls. You can also make it without stuffing if you don’t like cheese much. Use herbs whatever available or whatever you like and makeover your leftover rice into a tasty snack. 

Earlier shared one more rice ball recipe named bhater kofta with completely different taste and flavour. To get the recipe of  Bhater kofta click here.

Ingredients used to make these rice balls

Cooked rice – I Used 2 cup tightly packed leftover rice. Cooked rice with herbs taste great. 

Salt – Salt used to enhance the taste. Cheese is also slightly salty so one teaspoon is sufficient. You can taste the dough after mixing everything to check if require more.

Lemon juice – I used one and half teaspoon lemon juice for flavour and slightly tangy taste. You can add little more if you want.

Oregano – Oregano used to give a lovely flavour. You can use any herbs of your choice. 

Onion powder – Onion powder also used to enhance the taste. If you don’t have onion powder then you can use one finely chopped onion. 

Garlic powder – Garlic powder used for taste and garlicky flavour. I don’t like garlic much so used only half teaspoon. You can add 1-2 teaspoon if you like garlicky taste and flavour.

Chilli flakes – Chilli flakes used to give a spicy kick. You can skip or add more if you want. Use according to your taste.

Black pepper powder – Black pepper powder used for peppery flavour and mildly spicy taste. You can use little more if you like.

Rice flour – Rice flour used for binding and it will also make your rice balls crispy. 

Cornflour – Cornflour also use for binding. You can use breadcrumbs instead of cornflour.

Processed cheese cubes – I had Amul processed cheese cubes so I used it. You can also use grated cheddar cheese or mozzarella cheese.

You can use grated mozzarella cheese with rice and for stuffing.  These cheesy rice balls taste scrumptious but very easy to make. Just mix everything, make balls and fry. Cheese stuffing is completely optional. You can make these without cheese stuffing if you want. I often make without cheese stuffing. Use little grated cheese with rice only. You can also use Indian spices in rice dough. Add cumin powder, garam masala powder, amchur and chaat masala instead of oregano. You can also use finely chopped green chilli if you want. 

Subscribe with your mail address to get all the recipes straight to your mailbox immediately after publishing.

Recipe

Cooked rice – 2 cup tightly packed 

Salt – 1 teaspoon 

Lemon juice – 1&1/2 teaspoon 

Oregano – 2 teaspoon 

Onion powder – 2 teaspoon 

Garlic powder – 1/2 teaspoon 

Chilli flakes – 1/4 teaspoon, optional 

Black pepper powder – 1/2 teaspoon or to taste 

Rice flour – 1 tablespoon 

Cornflour – 2 tablespoon 

Processed cheese cubes – as required

Method

1.  Mash the cooked rice well. Add salt, lemon juice, oregano, onion powder, garlic powder, black pepper powder, rice flour, cornflour and Chilli flakes if using. You can add 1 teaspoon garlic powder if you want.

2.  Mix everything well. Cooked rice becomes like a dough. You can use finely chopped 1 onion instead of onion powder. See notes for more options. 

3. Add 1 grated processed cheese cube and mix everything well with your hand. Taste and adjust the seasoning.  Make equal size balls. I made 7 balls with this dough. 

4. Flatten the balls with your palm. Cut the cheese cube into 6 equal pieces. Place a piece of cheese cube in the middle. Gather the edges and make a ball again. Make all the cheese stuffed balls. 

5. Heat sufficient oil in a pan or wok. Fry the balls on medium heat till golden brown from all the sides. Don’t over crowd. Fry 3-4 balls at a time. 

6. When balls becomes golden brown take out the balls with a slotted spoon and place on a plate.  Serve immediately as a teatime snack or starter. 

Notes

1. Use more garlic powder if you like garlicky taste. 

2. Use chilli flakes and black pepper powder according to your taste. Skip if making for kids. 

3. Cheese stuffing is completely optional. I sometimes make it without cheese stuffing. These rice balls will be taste great in both ways. 

4. Breadcrumbs can be used instead of rice flour and cornflour.

5. You can also use grated cheddar cheese or mozzarella cheese instead of cheese cubes.

6. Indian spices can be used instead of Italian herbs. You can use cumin powder, garam masala powder, amchur and chaat masala instead of oregano. You can also use finely chopped onion and green chilli if you want. 

If you tried my recipe, you can share your food pictures with me in the social network sites by using hashtag, #batterupwithsujata I would love to see your creations.

I would love to hear from you. Please share your thoughts and suggestions in comment.

Please visit my facebook page and hit the like button to get the latest update

  Facebook page

Follow on

  Twitter

Instagram

Pinterest

Carrot Smoothie/Dairy Free Smoothie

Carrot smoothie with grapes orange mint and coconut milk. Fruity flavored Vegan smoothie with a mildly spicy kick from ginger taste divine. A perfect breakfast smoothie to start your day.

Freshly squeezed orange juice and all the goodness of different fruits with mint leaves, coconut milk and ginger made this smoothly nutritious and absolutely delicious. To get some different flavoured Smoothie recipes click here.

Ingredients used to make this smoothie

Carrot – Sweet earthy taste of carrot not only makes your smoothie delicious but carrot has so many health benefits.

It is crunchy, tasty, and highly nutritious. Carrots are a particularly good source of beta carotene, fiber, vitamin K1, potassium, and antioxidants Eating carrots is linked to a reduced risk of cancer and heart disease, as well as improved eye health. Additionally, this vegetable may be a valuable component of an effective weight loss diet. Source

Grapes – Sweet nutrients packed grapes will make your smoothie perfectly sweet tasty and nutritious.

Grapes offer a wealth of health benefits, primarily due to their high nutrient and antioxidant contents. Grapes offer several important nutrients and powerful plant compounds that benefit your health. Though they contain sugar, they don’t appear to negatively impact blood sugar control when eaten in moderation. Antioxidants like resveratrol provide most of grapes’ benefits, including their anti-inflammatory, anti-diabetes, and anticancer properties. To read more click here.

Banana – Sweet, nutritious and delicious banana will make your smoothie thick and creamy.

Bananas are a popular fruit with many potential health benefits. Bananas contain many essential nutrients and may benefit weight loss, digestion, and heart health. They may boost your digestion and heart health thanks to their fiber and antioxidant contents. Plus, they may support weight loss because they’re relatively low in calories, nutrient dense, and filling. Both ripe, yellow bananas and unripe, green bananas can satisfy your sweet tooth and help keep you healthy. Source

Orange – I used freshly squeezed orange. Vitamin C enriched orange will make your smoothie delicious and gives a lovely flavour. Discard all the seeds if you are also using freshly squeezed oranges.

Oranges are among the world’s most popular fruits — they’re as nutritious as they are tasty. They are a good source of vitamin C, as well as several other vitamins, minerals, and antioxidants. Some studies show that consuming citrus fruits like oranges on a regular basis may help lower the risk of certain health conditions, such as heart disease. Put simply, this bright citrus fruit is an excellent addition to a healthy diet. Source

Mint leaves – Used to enhance the taste and minty flavour. You can add more leaves if you like.

Ginger – Little ginger used to give a mildly spicy kick. If you don’t like then you can omit it.

Coconut milk – Coconut milk used to enhance the taste. I like the flavour of coconut milk. I had coconut milk powder so I used it. But you can use 1/4 to 1/2 cup canned or fresh coconut milk or use 1/4 cup grated fresh coconut instead of coconut milk.

Lemon – Used lemon to give a tangy taste and nice refreshing flavour.

Lemons contain a high amount of vitamin C, soluble fiber, and plant compounds that give them a number of health benefits. Lemons may aid weight loss and reduce your risk of heart disease, anemia, kidney stones, digestive issues, and cancer. Not only are lemons a very healthy fruit, but they also have a distinct, pleasant taste and smell that make them a great addition to foods and drinks. Source

Earlier shared two different smoothie recipes with coconut. Muskmelon coconut smoothie and Mango coconut flaxseed smoothie. You may also like to try Cornflakes banana smoothie from the blog of Priya Vijaykrishnan.

Its a filling and nutritious smoothie. You can serve this as breakfast smoothie or you can also enjoy this in your fasting days. You can also use soaked dry fruits in this smoothie. If you want to use almond, soak the almond in hot water and peel before using.

Subscribe with your mail address to get all the recipes straight to your mailbox immediately after publishing.

Recipe

Carrot – 2 medium

Grapes – 1/2 cup

Banana – 1

Orange juice – 1/2 cup

Mint leaves – 12-14

Grated ginger – 1/2 teaspoon

Coconut milk powder – 1/4 cup

Lemon juice – 1 teaspoon

Shredded almond to garnish

Method

1. Peel and cut the carrot into thin slices. Peel and chop the banana roughly.

2. Combine everything and blend till smooth and frothy. You can use 1/4 to 1/2 cup thick coconut milk instead of coconut milk powder. Or use 1/4 cup fresh grated coconut. Add ice cubes if you want your smoothie chilled.

3. Taste and add little more lemon juice if require. Pour the mixture in your favourite glass.

4. Garnish with shredded almond and mint leaves. You can also garnish with lemon wedges.

Enjoy……..

Notes

1. You can use any fruit of your choice.

2. 1/4 to 1/2 cup thick coconut milk can be used instead of coconut milk powder. Or use 1/4 cup grated fresh coconut. Blend well with all the other ingredients.

3. You can also use 2 tablespoon soaked and peeled almond in this smoothie.

If you tried my recipe, you can share your food pictures with me in the social network sites by using hashtag, #batterupwithsujata I would love to see your creations.

I would love to hear from you. Please share your thoughts and suggestions in comment.

Please visit my facebook page and hit the like button to get the latest update

Facebook page

Follow on

Twitter

Instagram

Pinterest

Chicken Keema Kali Mirch/Black Pepper Chicken Mince

Chicken keema kali mirch or black pepper chicken mince. A spicy delicious dry curry with minced chicken, black pepper, cashew nuts and aromatic spices. Easy and simple recipe but taste is scrumptious. Best accompany with any Indian flatbread.

This chicken keema kali mirch is one of my daughter’s favorite dish which she loves to enjoy in restaurant. When I was planning to make this dish she asked me to let her cook this restaurant style dish. Earlier she sometimes clicked my food pictures. But first time she made the dish and clicked. And its made me really happy. I amazed after tasting the dish. Taste is just awesome.

You may like some more chicken dishes from this blog.

1. Kolkata style chicken biryani

2. Yogurt chicken

3. Microwave chicken

4. Chicken rezala

5. Andhra chicken curry

6. Easy spicy pressure cooker chicken

7. No oil hariyali chicken

8. Sikkimese chicken curry

9. Chicken kosha

10. Zafrani chicken

11. Chicken dak bungalow

12. Chicken clear soup

13. Chicken chaap

14. Roasted drumstick

Blogger group

This post is going to be featured on Facebook gourmet group Shhhhh Cooking Secretly Challenge. In this group every month one of the members decide the theme. And members paired to give two secret ingredients each other. Best part is we paired every month with different bloggers so that we can interact each other. Sometimes we become very good friend. And after preparing the dish members share a picture of the dish and other members have to guess the ingredients. Fun game isn’t it?

Theme of this month is Restaurant Style Food suggested by Aruna who blog at Vasusvegkitchen. Aruna has a wonderful blog. I have to try her Pepper rice

This month my partner is Mayuri who blog at Mayuris Jikoni. I love her collection of restaurants style dishes. Recently bookmarked her Momo soup to try. Mayuri gave me Kasuri methi and lemon. I am sharing this chicken keema recipe using these ingredients. And I gave her ginger and ketchup as secret ingredients. Mayuri shared Kenyan style masala chips.

Recipe is very easy to make. For better taste cook on low flame. For ground spices with cashew nuts boil everything till soft or microwave for 10 minutes. Then grind into a smooth paste. Don’t skip freshly crushed black pepper. It will give lovely taste and strong flavour of black pepper. At last taste and adjust salt and lemon juice if required. If you want your dish more spicy add more green chilli and black pepper. And if you are making for kids reduce the amount of green chilli and black pepper.

Subscribe with your mail address to get all the recipes straight to your mailbox immediately after publishing.

Recipe

For marination

Chicken keema – 1/2 kg

Cumin powder – 3 teaspoon

Coriander powder – 3 teaspoon

Salt – 1 teaspoon

Black pepper powder – 1 teaspoon

To grind

Onion – 3 large, chopped

Cashew nuts – 20

Peppercorn – 1 teaspoon

Cardamom – 4

Cloves – 5

Cinnamon – 1 inch piece

Green chilli – 3-4

For gravy

Mustard oil – 4 tablespoon

Salt to taste

Sugar – 1 teaspoon

Ginger garlic paste – 2 tablespoon

Curd or yogurt – 1/4 cup

Black pepper powder – 2 teaspoon

Lemon – 1

Kasuri methi – 1 teaspoon

Garam masala – 1 teaspoon

Fresh cream – 1 tablespoon + to garnish

Rose essence or rose water – 1/2 teaspoon

Freshly crushed black pepper – 2 teaspoon

Method

1. Rinse the chicken keema well. Drain the water completely and marinate with cumin powder, coriander powder, salt and black pepper powder. Mix everything well. Cover and aside for 15-30 minutes.

2. Boil chopped onion, cashew nuts, peppercorn, cloves, cardamom, cinnamon and green chilli with water. Or microwave everything on high power for 10 minutes. Let it cool down. Grind everything into a smooth paste.

3. Heat a pan or wok. Add 4 tablespoon Mustard oil. Add the above ground paste. Saute for 2 minutes. Add 1 teaspoon Sugar and saute for 1 minute again.

4. Add 2 tablespoon Ginger garlic paste. Cook on low flame for 10 minutes. Keep stirring.

5..Add marinated chicken and mix well. Cover and cook for 20 minutes on simmer. Check and stir in regular interval to avoid sticking to the bottom.

6..Add 1/4 cup well beaten curd, mix and cook for 5 minutes. Keep stirring. Add 2 teaspoon Black pepper powder and salt as required. Cook for 5 minutes again.

7. Taste and adjust the seasoning. Add juice of one lemon, 1 teaspoon Kasuri methi and 1 teaspoon Garam masala. Stir for a minute and remove from heat.

8. Now add 1 tablespoon cream, 2 teaspoon freshly crushed Black pepper and 1/2 teaspoon Rose essence or rose water. Mix and cover the pan. Let it covered for 5-6 minutes. You can use more freshly crushed black pepper if you want.

9. Garnish with fresh cream and cilantro or coriander leaves. Serve hot with roti, paratha, naan, puri or any flatbread.

If you tried my recipe, you can share your food pictures with me in the social network sites by using hashtag, #batterupwithsujata I would love to see your creations.

I would love to hear from you. Please share your thoughts and suggestions in comment.

Please visit my facebook page and hit the like button to get the latest update

Facebook page

Follow on

Twitter

Instagram

Pinterest