Double Layered Aloo Paneer Cheese Paratha

Double layered aloo, paneer cheese paratha. A delicious layered paratha with potato, cottage cheese and cheese stuffing. Enjoy the different taste in one paratha.

Paratha or this Indian flatbread can be served in breakfast, lunch or dinner. But usually we make it for breakfast. A delicious and filling dish to start the day. Also sharing the method of only aloo paratha with this double layered paratha. If you feel your potato mixture for stuffing little soggy and difficult to roll, add 1-2 tablespoon roasted chickpea flour or sattu in the potato mixture. Keep aside for 10 minutes and you will get perfectly dry potato mixture.

You need atta or whole wheat flour, boiled potatoes, paneer or cottage cheese, cilantro or coriander leaves, green chilli with cheese and spices to make this paratha

You may like some more paratha recipes on this blog.

Sabudana or tapioca paratha or flatbread with sweet corn, green peas and paneer or cottage cheese. A delicious and easy to make fasting food.

Mixed veg stuffed paratha or pan fried flat bread with oats and whole wheat flour.

Peanut stuffed paratha. If you like the flavour of south Indian dishes then you will love South Indian flavour in this north Indian paratha. 

Usually we make aloo paratha, paneer paratha or cheese paratha separately. Or with aloo cheese mixture. But in this recipe you will get all the taste in one paratha. I made it with whole wheat flour or atta but you can use all purpose flour or maida for the dough. Or use half atta and half maida. Choice is your. Maida paratha is definitely more tasty but not healthy at all so better to use atta. To make the stuffing more spicy add more chopped green chilli and red chilli powder or if you are making for kids reduce or skip green chilli. Cheese is also optional. If you don’t like cheese, you can omit it. Always add little salt while boiling the potatoes. Similarly you can use green peas, cauliflower or any stuffings. If you don’t like paneer then you can use any stuffing of your choice instead of paneer.

Recipe

For dough

Whole wheat flour or atta – 1 cup

Salt – 1/2 teaspoon

Oil – 1&1/2 teaspoon

Water – 1/2 cup

For potato stuffing

Potato – 3, boiled

Cilantro or coriander leaves – 3 tablespoon

Green chilli – 2-3, finely chopped

Salt to taste

Cumin powder – 1 teaspoon

Chaat masala powder – 1 teaspoon

Cheese as require

For paneer stuffing

Paneer or cottage cheese – 1/2 cup tightly packed

Salt to taste

Cumin powder – 1/2 teaspoon

Chaat masala – 1/2 teaspoon

Cilantro or coriander leaves – 1/2 teaspoon

Green chilli – 1-2, finely chopped

Oil or ghee for frying paratha

Method

1. In a large bowl mix atta, salt and 1 teaspoon oil. Mix everything well. Now add water gradually and knead the dough. Don’t add entire water in one go. Knead the dough to make soft dough like roti or paratha. Dough shouldn’t be too soft, make a pliable dough. Smear the dough with 1/2 teaspoon oil. Cover and keep aside for 15-20 minutes.

2. Peel and grate the boiled potatoes. You can use potato masher to mash the potatoes. There shouldn’t be any lump. Add salt, chopped cilantro or coriander leaves, green chilli, cumin powder and chaat masala powder. Mix well. If you don’t have chaat masala use anardana powder or dry mango powder/amchur. You can also add little garam masala powder and red chilli powder if you like.

3. In another bowl grate or mash the paneer. I have used homemade paneer. To get the method of making paneer click here. Add salt, cumin powder, chaat masala powder, chopped green chilli and coriander leaves. Mix well.

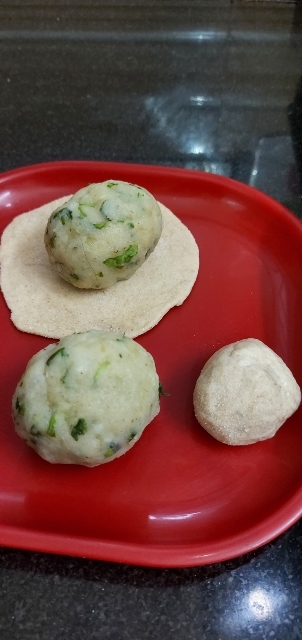
4. Now knead the dough again. Make small puri like balls. We need three small balls for each paratha.

5. Take one ball and roll with rolling pin into a thin roti. Roll the ball evenly. Sides should be also thin. Roll thin roti as much as you can. Make two roti and place on a plate.

6. Take third ball and make a thin roti again. Spread a thick layer of patato mixture over it leaving the sides. Spread grated cheese over the potatoes. I have Amul diced cheese. A blend of mozzarella and cheddar cheese. So I used it with little cheese slice pieces. You can use any grated cheese.

7. Place a thin roti over it. Press gently with your fingers. Seal the edges by pressing with your finger tips. Spread paneer mixture over it leaving the sides. Cover it with another thin roti. Seal the edges again.

8. Press gently and sprinkle some flour on top and turn upside down. Sprinkle some flour again. Roll it very gently. Don’t press much.

9. Heat a tawa/skillet or pan. Place the paratha on it. Keep the flame low medium to cook the paratha evenly. Flip the paratha upside down and cook the other side till light brown. Press the paratha gently with a spatula.

10. Spread oil or ghee on both sides. And fry the paratha on low medium heat till golden brown. Flip the paratha carefully to avoid breaking like this.

11. You can cut the paratha in four pieces before serving with pizza cutter or knife. I have made three large size paratha with this stuffing. For remaining dough boiled two more potatoes and made simple aloo paratha.

12. For perfectly delicious aloo paratha always take the dough ball smaller than potato mixture. Dip the ball in flour and roll into 5 inch diameter. Make the potato stuffing as above. Place potato mixture in the middle. You can add some grated cheese with potato mixture. Kids will love the cheesy taste.

13. Gather the edges and pinch to seal it properly. After sealing well gently press with your palm. Dip the stuffed ball in flour and roll the paratha evenly. Roll into thin or thick paratha as you like. I like my aloo paratha thin. Don’t press much roll gently.

14. Now fry the paratha on medium high heat. Press the paratha with a spatula. Fry from both sides with oil or ghee.

15. Or you can roll two thin roti. Spread the stuffing on one roti and cover it with another roti. Seal the edges by pressing with your fingers tips. Sprinkle some dry flour and roll the paratha evenly. Fry the paratha as above method.

16. Serve hot paratha with curd or raita, pickle and butter.

Notes

1. You can add finely chopped onion in the stuffing.

2. You can make the paratha dough with maida or refined flour or use half refined flour/maida and half whole wheat flour/atta if you want.

3. You can use amchur, garam masala, anardana, red chilli powder or any spices of your choice.

4. Use green chilli according to your taste.

5. Green peas, cauliflower or any stuffing can be used instead of paneer.

If you tried my recipe, you can share your food pictures with me in the social network sites by using hashtag, #batterupwithsujata I would love to see your creations.

I would love to hear from you. Please share your thoughts and suggestions in comment.

Please visit my facebook page and hit the like button to get the latest update

Facebook page

Follow on

Twitter

Instagram

Pinterest

Tisane Or Caffeine Free Herbal Tea

Tisane or caffeine free herbal tea with blue pea and chamomile tea, HolyBasil and mint. A refreshing and flavorful drink with numerous health benefits. Enjoy the delicious aromatic tea warm or chilled.

According to Wikipedia Herbal teas—less commonly called tisanes are beverages made from the infusion or decoction of herbs, spices, or other plant material in hot water. The term “herbal tea” is often used in contrast to true teas, which are prepared from the cured leaves of the tea plant, Camellia sinensis. 

Tisanes or caffeine free herbal tea can be served hot and cold both. I have used Organic Blue pea and chamomile tea bags or herbal infusion to make this tea. But if you don’t have blue pea tea then you can use any green tea bag. And I have Ceylon cinnamon dip bags or pouch so I used it. These herbal infusion bags are full of strong cinnamon flavour. But you can also use cinnamon powder if you want.

To get one more herbal tea click here. This blue pea tea looks beautiful blue in colour but when you add lemon juice it becomes purple.

Ingredients used in this herbal tea.

1. Blue pea and chamomile tea. Blue Tea is made by seeping dried butterfly-pea flowers in water and can be enjoyed both hot and cold. It is also said to have weight loss benefits. Blue tea is said to have detox and weight loss benefits Blue tea is caffeine-free and a good alternative to tea or coffee.  While chamomile is very well-known for its mild and soothing flavour that acts as a stress buster. To read more about blue pea tea click here.

Cinnamon. The spice comes from the inner bark of a small evergreen tree. The bark is peeled and laid in the sun to dry, where it curls up into rolls known as cinnamon sticks. Cinnamon is also available in powdered form. It has anti-viral, anti-bacterial and anti-fungal properties. Contains antioxidants with anti-inflammatory effects. Its prebiotic properties may improve gut health. Reduces blood pressure. Lowers blood sugar and risk of type 2 diabetes. Relieves digestive discomfort. Source

Tulsi or Holy Basil From the leaves to the seed, holy basil is considered a tonic for the body, mind, and spirit. Different parts of the plant are recommended for treating different conditions. The nutritional valueTrusted Source is also high, as it contains: vitamin A and C, calcium, zinc, iron, chlorophyll. Holy basil has been shown to boost your body’s health in a variety of ways. It can help protect against infection, lower your blood sugar, lower your cholesterol, ease joint pain, and protect your stomach. Source – Healthline

Lemons are high in vitamin C, fiber, and various beneficial plant compounds. These nutrients are responsible for several health benefits. Lemons contain a high amount of vitamin C, soluble fiber, and plant compounds that give them a number of health benefits. Lemons may aid weight loss and reduce your risk of heart disease, anemia, kidney stones, digestive issues, and cancer. Not only are lemons a very healthy fruit, but they also have a distinct, pleasant taste and smell that make them a great addition to foods and drinks. Source

Mint makes a delicious and healthy addition to many foods and beverages. Mint’s health benefits range from improving brain function and digestive symptoms to relieving breastfeeding pain, cold symptoms and even bad breath. To know more click here.

Rock salt or Sendha namak, a type of salt, is formed when salt water from a sea or lake evaporates and leaves behind colorful crystals of sodium chloride. Sendha namak, or rock salt, has long been used in Ayurvedic medicine to boost skin health and treat coughs, colds, and stomach conditions. Sendha namak is highly valued in Ayurveda, a system of alternative medicine originating in India. According to this tradition, rock salts offer numerous health benefits, such as treating colds and coughs, as well as aiding digestion and eyesight. Source

So here is a healthy and aromatic warm drink to enjoy in the Monsoon. You may also like this hot delicious Lemon coriander amla soup by Swaty Malik As I mentioned above that you can serve this caffeine free herbal tea hot or cold. If you don’t have blue pea tea then you can use green tea instead. I used ginger powder as I always use it in my regular Herbal tea But you can use fresh ginger. Just grate the ginger before adding in the water. And instead of Cylon cinnamon dip bag you can use 1 teaspoon Cinnamon powder.

Recipe

Blue pea and chamomile tea bags or green tea bag – 2

Tulsi or HolyBasil – 15 leaves

Cinnamon dip bag – 1, or 1 teaspoon Cinnamon powder

Lemon – 4 slices

Dried ginger powder or fresh grated ginger – 1 teaspoon

Mint – 15 leaves

Rock salt – a pinch

Honey to taste, optional

Water – 4 cup

Lemon juice – 2 – 3 teaspoon or to taste

Method

1. Boil the water with tulsi or Holy basil leaves, dried ginger powder, rock salt and mint leaves for 5 minutes.

2. In a teapot place teabag and cinnamon pouch. Pour the boiled water with tulsi, mint leaves and dried ginger. Also add a few fresh tulsi, mint leaves and lemon slices.

3. Cover the teapot and let it steep for 5 minutes.

4. Now strain the tea in cup. Add honey and lemon juice to taste. Enjoy caffeine free refreshing and flavorful warm blue tea anytime. Or let it cool down and serve chilled with some ice cubes. Or refrigerate the tea and serve chilled.

Notes

1. If you don’t like your tea sweet skip honey.

2. You can use any sweetener instead of honey.

3. Green tea bag can be used instead of blue pea teabag.

4. You can also use cinnamon powder instead of cinnamon dip bag.

If you tried my recipe, you can share your food pictures with me in the social network sites by using hashtag, #batterupwithsujata I would love to see your creations.

I would love to hear from you. Please share your thoughts and suggestions in comment.

Please visit my facebook page and hit the like button to get the latest update

Facebook page

Follow on

Twitter

Instagram

Pinterest

Masoor dal Chochchori Or Chorchori

Masoor dal chochchori or chorchori. A flavorful and delicious thick dal to serve with roti, paratha or steamed rice. Easy to cook but taste is scrumptious. This red lentil or Masoor dal chochchori is an age old recipe from Bengali cuisine.

After bhaja muger dal and narkol die chholar dal this Masoor dal chochchori is my most favourite dal. Serve it as a side dish or enjoy bowlful hot dal on its own. Earlier shared one more masoor dal recipe from Bengali cuisine. To get the recipe click here.

This recipe is my contribution for 306 #Foodiemonday bloghop theme is dal or lentil. This time it was my turn to suggest. Let’s see what my fellow bloggers share. Waiting for some wonderful dal or lentil recipes.

This dal recipe is very easy but taste is absolutely mouthwatering. I have used fried garlic cloves to garnish because my daughter loves fried garlic cloves in dal but you can skip this step if you don’t like. Also Kashmiri red chilli powder is not used in authentic recipe but I used to add some colour. You can use mustard oil to make this dal and omit ghee. Or make the dal with any oil and add a teaspoon of ghee before removing from heat. Choice is your.

Recipe

Masoor dal or red lentil – 1 cup

Green cardamom – 2-3

Cinnamon – 1/2 inch piece

Cloves – 3

Bay leaf – 1

Onion – 1, chopped

Garlic – 3-4

Ginger – 1/2 inch piece

Ghee or clarified butter – 2 tablespoon

Salt to taste Sugar – 1/2 teaspoon, optional

Garlic cloves – 6 to garnish, optional

Cumin powder – 1/2 teaspoon

Coriander powder – 1/2 teaspoon

Kashmiri red chilli powder – 1 teaspoon, optional

Water – 3 cup

Cilantro or coriander leaves – 2-3 tablespoon, chopped

Green chilli – 3-4 or to taste

Method

1. Wash the dal well and soak in water for 5-10 minutes. Drain the water completely and keep aside.

2. Crush the cardamom, cinnamon and cloves in a mortar pestle.

3. Grind onion, garlic, ginger and one green chilli into a smooth paste.

4. In a small bowl mix turmeric powder, cumin powder, coriander powder, Kashmiri red chilli powder and 1 tablespoon water. Mix well. You can use hot variety red chilli powder if you want your dal more spicy.

5. In a pan or wok heat ghee or clarified butter. You can use half ghee half oil if you want. See notes for more options.

6. Fry the garlic cloves till golden brown and take out of the ghee or clarified butter. This step is optional. You can skip if you want.

7. Add crushed cardamom, cinnamon, cloves and bay leaf. Add onion, garlic, ginger, chilli paste and saute till oil leaves the sides and raw smell of onion garlic goes away.

8. Add water mixed all the spices. Fry again till everything dried up and oil leaves the sides.

9. Now add drained dal or red lentil. Saute for 2 minute. Add water, salt, chopped cilantro or coriander leaves, 2-3 green chilli and sugar if using. Mix well.

10. Cover and cook for 10 minutes or until dal becomes soft and thick on medium flame. Check in-between and stir. Dal should be thick. Taste and adjust salt if required.

11. Garnish with cilantro or coriander leaves and fried garlic cloves if using. Serve with steamed rice or Indian flatbread or any bread.

Notes

1. Mustard oil can be used instead of ghee or clarified butter.

2. Add green chilli according to your taste. Use more green chilli or red chilli powder if you want your dal spicy.

If you tried my recipe, you can share your food pictures with me in the social network sites by using hashtag, #batterupwithsujata I would love to see your creations.

I would love to hear from you. Please share your thoughts and suggestions in comment.

Please visit my facebook page and hit the like button to get the latest update

Facebook page

Follow on

Twitter

Instagram

Pinterest

Sweet Potato Halwa With Date Palm Jaggery Or Khajur Gur

Sweet potato or shakarkand halwa with date palm jaggery or khajur gur. Try this easy to make dessert and enjoy the delectable taste. Sweet potato and date palm jaggery or khajur gur/Patali gur mixed taste is heavenly.

If you don’t have date palm jaggery then you can use cane jaggery, sugar or brown sugar. But date palm jaggery will taste divine. Earlier shared Sweet potato dumplings or pithe now here is one more sweet potato recipe for you. Sweet potatoes are nutrient-dense root vegetables that come in a variety of colors. They’re high in fiber and antioxidants, which protect your body from free radical damage and promote a healthy gut and brain. They’re also incredibly rich in beta-carotene, which is converted to vitamin A to support good vision and your immune system. Source

As I mentioned above you can use any sweetener instead of date palm jaggery but flavour and taste may be different. Here are some health benefits of date palm jaggery.

• Benefits of having date palm jaggery in winters.

• Relieves common ailments like cold and cough.

• Rich in nutrients.

• Helps in weight loss.

• Boosts energy.

• Treats menstrual pain.

• Restores healthy digestion.

• Eases joint pain.

To read more about date palm jaggery click here.

Try this delectable halwa and serve warm as a dessert. Normally halwa needs lots of ghee or clarified butter but to make this halwa you need only one teaspoon ghee. So you can call it a healthy treat. Don’t skip the milk to get the exact taste. You can use any dry fruits of your choice.

Recipe

Sweet potato – 2, boiled

Oil – 2 tablespoon

Cashew nuts – 8

Raisins – 1 tablespoon

Date palm jaggery or khajur gur – 3 tablespoon, grated or finely chopped

Milk – 1 cup

Cardamom powder – 1/4 teaspoon

Ghee or clarified butter – 1 teaspoon

Method

1. Peel and mash the sweet potatoes and keep aside.

2. Heat oil in a pan. Fry the cashew nuts till golden brown. Remove from oil and fry raisins in the same oil. When raisins starts to fluff up immediately remove from oil. You can also use almond or any dry fruits of your choice.

3. Add peeled and mashed sweet potatoes and saute till sweet potatoes leaves the sides. It will take about 2-3 minutes.

4. Add milk and stir continuously. When milk about to dried up add gur or jaggery, fried cashew nuts, raisins and mix well. Cook till moisture evaporate. Stir continuously.

5. Add cardamom powder and 1 teaspoon ghee. Mix well and switch off the heat.

6. Garnish with grated jaggery and fried cashew nuts. Serve warm.

If you tried my recipe, you can share your food pictures with me in the social network sites by using hashtag, #batterupwithsujata I would love to see your creations.

I would love to hear from you. Please share your thoughts and suggestions in comment.

Please visit my facebook page and hit the like button to get the latest update

Facebook page

Follow on

Twitter

Instagram

Pinterest

Masala Paniyaram Or Appe

Masala paniyaram or appe. A delicious and cute looking snack or breakfast dish with only a few drops of oil. Earlier shared some easy and quick instant appe recipe. Now sharing authentic recipe of appe or masala paniyaram. You need only thick grain rice and black lentils or udad dal with some spices to make this delicious appe/kuzhi paniyaram or paddu.

You can also use leftover fermented idli or dosa batter to make appe.

Paddu is an Indian dish made by steaming batter using a mould. It is named variously kuzhi paniyaram, paniyaram, paddu, guliyappa, yeriyappa, gundponglu, gunta ponganalu, or Tulu: appadadde, appe. The batter is made of black lentils and rice and is similar in composition to the batter used to make idli and dosa.  Wikipedia

My Family members and friends love these appe as breakfast or snacks. I got this recipe 7-8 years ago from my friend Keerti Gupta. Now she is just like my younger sister. We met in a food group. That time I was a novice in food photography and writing recipes. I started to share my diabetic friendly innovative recipes whatever I tried for my husband. I love the way Keerti shared her recipes and interact with other group members. She always supports me and gave all the tips and tricks to click and write down the recipes. Now she is not active on social media but we are still connected with each other. I am very happy today to sharing her recipe on my blog. Thanks Keerti for the recipe.

Copy pasting Keerti’s words here. “The authentic recipe looks little cumbersome but trust me this gonna taste heaven.” So friends try and enjoy these delicious cuties as snacks or breakfast.

You may like some instant appe recipes on this blog.

1. Carrot peas instant appe

2. Rice appe with cooked rice

3. Masoor dal or red lentil appe

4. Beetroot appe

5. Semolina and lentil appe

6. Roasted gram or sattu appe

7. Semolina and flatten rice appe

8. Sprouts and oats appe

Monday again and this week’s 305 #Foodiemonday bloghop theme is Monsoon Snacks suggested by Sasmita Sahoo Samanta who blog at First Timer Cook. You can get numerous delicious recipes on her space like Jamun coconut panna cotta and many more.

My contribution for this theme is this healthy and yummy masala paniyaram. You need thick rice or mota chawal or idli rice to make these appe. But sometimes I also used regular Basmati rice if thick rice or idli rice was not available. But now its always available in local grocery store. You have to soak rice and split black lentils or udad dal overnight and grind in the morning. Let it ferment till evening and make the paniyaram for evening snacks. Or you can soak rice and lentil in the morning and grind in evening. Ferment overnight and your batter will ready for breakfast. You can half the ingredients if you want. Rice:dal ratio should be 1:1/3. You need only a drop of oil for each appe and after flipping no oil required for cooking other side.

Recipe

Thick rice/mota chawal or idli rice – 3 cup

Black lentils or udad dal – 1 cup

Salt to taste

Cilantro or coriander – handful, chopped

Green chilli – 3-4 or to taste, finely chopped

Ginger – 1 inch piece, grated or paste

Grated Coconut – 1/4 cup to 1/2 cup, optional

Mustard seeds or rai as require

Vegetable oil as require

Curry leaves – 1 tablespoon, finely chopped

Method

1. Wash & soak dal and rice separately for atleast for 5 hours or overnight. I have used split black lentils or udad dal.

2. First grind dal with little water to a smooth paste and in the same jar grind the rice with just enough water.

3. In a large bowl mix ground rice, udad dal or black lentils and salt. Mix well and cover with a lid (not an airtight lid). Leave it overnight to ferment. You can keep it in your switched off microwave oven. Batter will rise after ferment so don’t fill the bowl. Fill half of the bowl only or batter will be spilled out of the bowl after ferment.

4. In the morning the batter should be raised but in case it doesn’t add a teaspoon of Eno fruit salt just before pouring them in Paniyaram Pan. If the batter has raised, dont use eno.

5. Add chopped cilantro or coriander leaves, green chilli, ginger, chopped curry leaves and coconut if using. Mix well.

6. Heat a appe or paniyaram pan on high flame. Now simmer the flame and pour one drop of oil in each slot.

7. Sprinkle a pinch of rai. When the seeds starts to splutter start pouring Paniyaram batter in every holes. Flame should be sim.

8. After filling all the holes close the pan with a lid & Increase the flame to low medium. Dont ever put it on high.Let it cook for 3-4 minutes, checking occasionally. Remember the slots in middle cook faster than others.

7. When appe becomes nicely browned, flip them with fork or spoon or wooden stick. After flipping dont cover.

8. Cook on low medium heat. This side will take more time than the previous one so please be patient. If u increase the flame they will burn and remain raw from inside.

9. Now your masala paniyaram is ready. Serve with any chutney or sauce of your choice.

Notes

1. If batter doesnt rise overnight add a teaspoon of Eno right before you pour the batter in pan.

2. You can add grated carrot, onion or any vegetable of your choice.

3. You need only a drop of oil. After flipping the appe or paniyaram you don’t need need to add oil again.

4. Patience is the key, dont leave the sight else it will be a mess. Better to cook on low heat for crisp outside paniyaram.

5. Paniyarams taste best when hot.

If you tried my recipe, you can share your food pictures with me in the social network sites by using hashtag, #batterupwithsujata I would love to see your creations.

I would love to hear from you. Please share your thoughts and suggestions in comment.

Please visit my facebook page and hit the like button to get the latest update

Facebook page

Follow on

Twitter

Instagram

Pinterest

Microwave Chicken

Microwave chicken. Again sharing a simple yet absolutely delicious chicken recipe in an easy peasy way. Just mix everything and microwave for 8 to 10 minutes and your chicken curry is ready with only 2 teaspoon oil. Easy isn’t it?

Earlier shared one more no oil microwave chicken or Hariyali chicken on this blog. In this recipe I used only 2 teaspoon oil. If you want more spicy add some more slit or chopped green chilli and red chilli powder. You can serve it with any bread or rice dishes. I served it with steamed rice and Beetroot green stir fry.

This Monday our 304 #Foodiemonday bloghop theme is Side Ka Kamaal suggested by Priya Vijaykrishnan who blog at Sweet Spicy Tasty. Priya suggested us to share any side dish. My contribution is this easy and healthy chicken curry for this theme. Priya has a wonderful collection of South Indian recipes on her blog. As the name of her blog you can get many other different types of sweet spicy and tasty recipes on her space. I recently bookmarked her Vegan kootu curry to try.

This is a microwave recipe. But you can also make it on stove top in the same way. Use a nonstick pan to fry the onions in less oil. Or you can use barista or fried onions too. Use green chilli according to your taste. To make more spicy add some more chopped or slit green chili and red chilli powder. Or if you are making for kids omit chilli. You don’t need to add water. Chicken will release enough water to cook. You can add a spoonful of ghee or clarified butter at the end if you want.

Recipe

Chicken – 500 gram

Curd or yogurt – 5 tablespoon

Ginger garlic paste – 2 tablespoon

Cumin powder – 1 teaspoon

Coriander powder – 1 teaspoon

Kashmiri red chilli powder – 2 teaspoon

Turmeric powder – 1/2 teaspoon

Garam masala powder – 1/2 teaspoon

Onion – 2 large

Mustard oil – 1 teaspoon, optional

Slit green chilli – 3-4 or to taste

Lemon juice – 1 teaspoon

Vegetable oil – 1 teaspoon

Salt to taste

Method

1. Marinate the chicken pieces with salt, curd, cumin powder, coriander powder, turmeric powder, Kashmiri red chilli powder, ginger garlic paste, lemon juice and mustard oil if using. Mix everything well. Cover and keep it in refrigerator for one hour.

2. Thinly slice the onions. In a microwavable glass bowl mix sliced onion and 1 teaspoon vegetable oil. Microwavable on high power for 2 minutes. Stir and microwavable again for 1-2 minutes or till onion slices becomes brown.

3. After 1 hour take out the marinated chicken from refrigerator. Mix brown onion slices into the chicken. Reserve 2 tablespoon for garnishing. You can grind the brown onion and add brown onion paste into the chicken if you like smooth gravy.

4. Add slit green chilli according to your taste.

5. Mix and microwave on high power for 8-10 minutes. Use a loosely covered microwavable glass bowl. Check after 8 minutes. Stir well and microwave again for 1-2 minutes if require.

6. Garnish with fried sliced onion and cilantro or coriander leaves. Serve with steamed rice, jeera rice, pulao or any bread.

Notes

1. Use chilli according to your taste.

2. Barista or fried onions or paste of fried onions can be used in the chicken.

If you tried my recipe, you can share your food pictures with me in the social network sites by using hashtag, #batterupwithsujata I would love to see your creations.

I would love to hear from you. Please share your thoughts and suggestions in comment.

Please visit my facebook page and hit the like button to get the latest update

Facebook page

Follow on

Twitter

Instagram

Pinterest

Baked Bitter Gourd Or Karela

Baked bitter gourd or karela. Make this nutritious and immunity booster vegetable in an easy way. You don’t need to spend lots of time in kitchen in this scorching hot weather. Just mix everything and bake. Enjoy the crispy bitter gourd as a side dish.

You can peel the bitter gourd if you don’t like the bitterness. And add more onions while baking. You can also add some lemon juice before serving. Crispy delicious baked karela will be a perfect side dish for any meal.

You may like some more bitter gourd recipes on this blog.

1. Bitter gourd with tomato

2. Sukto

3. Gujarati bitter gourd stir fry

4. Bitter gourd dopyaza

5. Crispy bitter gourd and potato

According to Healthline here are some health benefits of bitter gourd.

• Packs Several Important Nutrients. Bitter melon is a great source of several key nutrients.

• Can Help Reduce Blood Sugar.

• May Have Cancer-Fighting Properties.

• Could Decrease Cholesterol Levels.

• May Aid Weight Loss.

• Versatile and Delicious.

Linking this recipe to Facebook gourmet group Shhhhh Cooking Secretly Challenge. In this monthly group members are paired with different partners every month and two secret ingredients are given to each other. We have to use these ingredients in our recipe. This month theme is Fear Not Bitter suggested by Seema Doraiswamy Sriram who blog at Mildly Indian. Seema is a very talented blogger. You can get numerous healthy and delicious recipes on her blog. I recently bookmarked her Millet jaggery cake and some more.

This month my partner is Poonam Bachhav. I love her space for her versatile recipes. Specially her authentic thali recipes. You can also get many delicious, healthy treat on her blog. You will definitely love her Mango bundt cake and many more. Poonam gave me cumin and Amchur as secret ingredients and I gave her milk and jaggery. Poonam made Eggless banana chocolate cupcakes with these ingredients.

You can use as much shallot or small onions as you want. Sliced onion and shallot both will reduce the bitterness. I used Kashmiri red chilli powder to add some colour. You can skip it or if you want your karela more spicy then you can add hot variety red chilli powder.

Recipe

Bitter gourd or karela – 2

Shallot/sambhar onion or small onions – 15

Onion – 1 large Salt to taste

Cumin powder – 1/2 teaspoon

Coriander powder – 1 teaspoon

Turmeric powder – 1/2 teaspoon

Kashmiri red chilli powder – 1 teaspoon

Amchur or dry mango powder – 1 teaspoon

Oil – 1 tablespoon + 1 teaspoon

Coriander leaves and lemon wedges to garnish

Method

1. Wash the karela or bitter gourd and cut off the both tips. Cut the bitter gourd or karela into thin round slices. You can peel the bitter gourd to reduce the bitterness. I didn’t.

2. Peel the sambhar onion or shallot and keep aside. Slice one large onion. You can use one more onion if you like.

3. Line a baking tray with parchment paper or aluminum foil and brush with little oil. I used parchment paper.

4. In a bowl mix all the dry spices, salt, 1 tablespoon oil and bitter gourd slices. Mix well and keep aside for 10-15 minutes.

5. Arrange the marinated bitter gourd slices on lined baking tray in single layer.

6. In the same bowl mix shallot and onion slices with little salt and one teaspoon oil.

7..Bake the bitter gourd slices at 200 degree temperature for 10 minutes.

8. Take out the baking tray and mix both the onion with bitter gourd slices.

8. Bake for 10 minutes again or until bitter gourd becomes crisp. Keep an eye after 7 minutes. Bitter gourd shouldn’t be burnt.

9. Garnish with cilantro or coriander leaves and lemon wedges. You can add some lemon juice before serving. Serve warm as a side dish.

Note- To reduce the bitterness peel the bitter gourd and use more onion.

If you tried my recipe, you can share your food pictures with me in the social network sites by using hashtag, #batterupwithsujata I would love to see your creations.

I would love to hear from you. Please share your thoughts and suggestions in comment.

Please visit my facebook page and hit the like button to get the latest update

Facebook page

Follow on

Twitter

Instagram

Pinterest