Healthy Apple And Grape Jam/Sugar free Jam

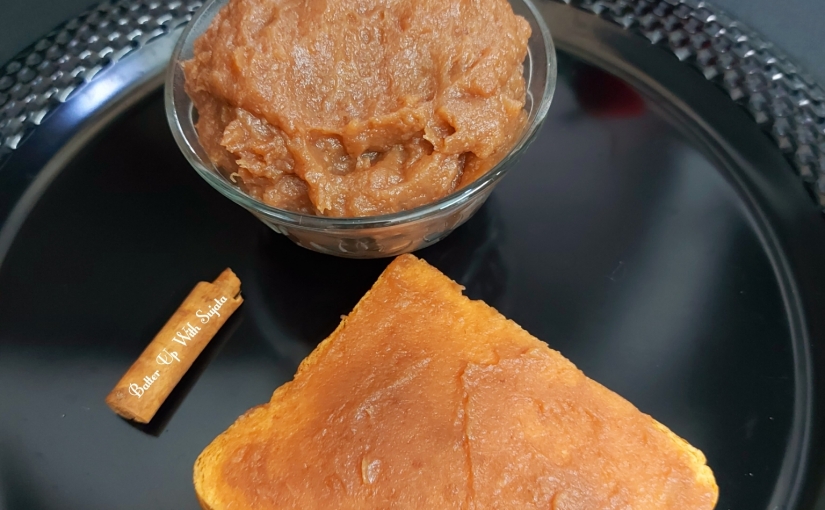
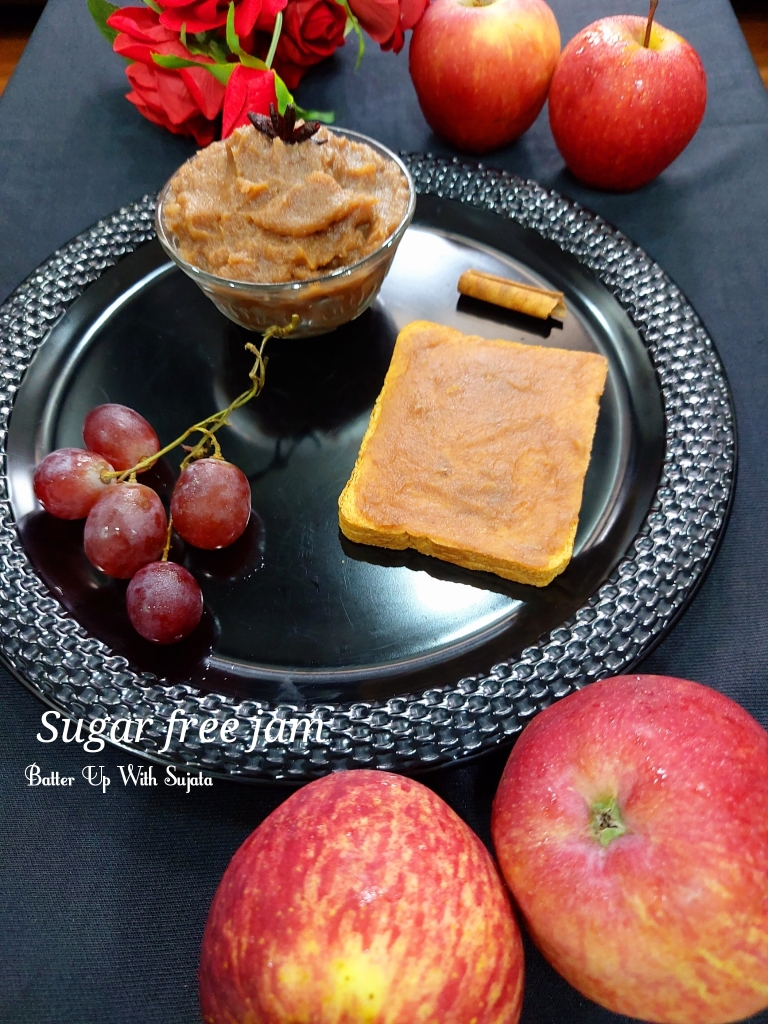
Sugar free jam. Surprised right? Yes this delicious apple and grape jam is absolutely sugar free. But taste is scrumptious. Spread this guilt free jam on your toast or enjoy with any bread. I am sure you will love the taste and flavour. 

This apple and grape jam is sweetened with dry date powder. As we all know that dates are highly nutritious. And aroma of star anise and cinnamon gives a lovely flavour to the jam. So its a perfect treat for kids and adults both. Health conscious people can enjoy this delicious fruit jam without any guilt. But remember enjoy the delectable taste of this jam but everything should eat in moderation. 

We need only apple, red grape, cinnamon, star anise, lemon juice and dry date powder to make this delicious and healthy jam. Not only elders but let your children enjoy this healthy treat. 

Dates are a very healthy fruit to include in your diet. They are high in several nutrients, fiber and antioxidants, all of which may provide health benefits ranging from improved digestion to a reduced risk of disease. It’s easiest to find dates in their dried form, though these are higher in calories than fresh fruit so it is important to eat them in moderation. Dates are definitely worth adding to your diet, as they are both nutritious and delicious.

8 Proven Health Benefits of Dates

• Very Nutritious. Share on Pinterest

• High in Fiber. Getting enough fiber is important for your overall health.

• High in Disease-Fighting Antioxidants.

• May Promote Brain Health.

• May Promote Natural Labor.

• Excellent Natural Sweetener.

• Other Potential Health Benefits.

• Easy to Add to Your Diet.

Source – Healthline

I am a member of a blogger group Shhhhh Cooking Secretly Challenge. Every month we share recipes using two secret ingredients given by our partners. This month theme is jam and jelly suggested by Preeti Tandon Shridhar. Preeti who blog at Cakes and curries shared this delicious recipe..

This month my partner is Mayuri Patel who blog at Mayuris Jikoni gave me cinnamon and date powder as secret ingredients. And I gave her lemon juice and cardamom. Mayuri shared this nutritious and tasty Watermelon rind jam with these ingredients.

As I mentioned above diet conscious people can enjoy this delicious jam with breakfast but everything we should eat in moderation. 1-2 spoon jam is okay in breakfast to satisfy your sweet craving.  You can use lemon juice according to your taste. And use any grape if you don’t have red grape. We are using dry date powder so textures will be little different from jam made with sugar. You can also use any fruit of your choice.

Subscribe with your mail address to get all the recipes straight to your mailbox immediately after publishing.

Video recipe of this healthy and delicious jam

Recipe

Apple – 3 

Grapes – 1 cup 

Star anise – 1

Cinnamon – 1 stick 

Dry date powder – 1/3 cup 

Lemon juice – 1 tablespoon 

Water – 1 cup 

Method

1. Wash the apples and grapes well. Peel deseed and chop the apples into small pieces. 

2. Chop the grapes into 4 pieces. Discard the seeds. 

3. Heat a pan and add add chopped apples and grapes, star anise, cinnamon and 1 cup water.

4. When it starts to rolling boil reduce the heat. Cover and cook on simmer for 5 minutes.  Remove the cover and stir well.

5. Cook on high heat for 5 minutes uncovered. Keep stirring to avoid spilling. You can reduce the flame in-between. Watch video recipe for detailed method. 

6. After 5 minutes switch off the heat. Let it cool down.  Remove the star anise and cinnamon when cool.

7. Now blend into a smooth paste.  Heat a pan and add the paste. Add cinnamon and star anise again. Add dry date powder and mix everything well.

8. Taste the mixture when it starts to become thick. Add more dry date powder if required. It depends on the sweetness of grapes and apples. Mine was perfectly sweet with 1/3 cup date powder. 

9. Cook till mixture becomes thick and starts to leaving the sides of the pan.  When mixture thickened switch off the heat and let it cool down. 

10. Add lemon juice and mix. Add half lemon juice if you don’t want your jam tangy. I have used 1 tablespoon for a lovely sweet and tangy taste.  Now finally remove the star anise and cinnamon. Store the jam in a sterilized jar.

Notes

1. You can use any fruit of your choice.

2. Cinnamon powder can be used instead of cinnamon stick.

  If you tried my recipe, you can share your food pictures with me in the social network sites by using hashtag, #batterupwithsujata.

I would love to hear from you. Please share your thoughts and suggestions in comment. 

Please visit my facebook page and hit the like button to get the latest update 

Facebook

Follow on 

Twitter

Instagram

Pinterest

Lemon Coconut Rice With Kaffir Lime Leaves

Lemon coconut rice with kaffir lime leaves. A delicious aromatic rice to serve with any spicy curry. Fragrant Kaffir lime leaves infused rice taste divine. And coconut milk gives a rich buttery flavour. Recipe is very simple and easy and completely gluten free and dairy free. You don’t need ghee or clarified butter to make this fragrant rich buttery luscious rice.

Kaffir lime leaves called gondhoraj lebur pata in Bengali. Earlier shared a delicious Cake with Kaffir lime. Click here for the recipe.

Citrus hystrix, called the kaffir lime or makrut lime, is a citrus fruit native to tropical Southeast Asia. Its fruit and leaves are used in Southeast Asian cuisine and its essential oil is used in perfumery. Its rind and crushed leaves emit an intense citrus fragrance. Wikipedia

Did you know that Kaffir lime leaves are super healthy for you? Read on to learn the 6 top health benefits of Kaffir leaves.

1. Stress, Stress Go Away

2. Bad Breath No More

3. No Bacteria Allowed

4. Get Healthy, Glowing Skin

5. Protect Your Mane

6. Buzz Off!

To read more health benefits of Kaffir lime leaves Click here.

Recipe is very easy and simple. You don’t need much spices for this fragrant rice. I have used sweet corn and green peas but you can use any vegetable of your choice. And add green chilli according to your taste. You can skip chilli if you are making for kids. If you don’t have have Kaffir lime leaves then use 1/2 to 1 teaspoon lemon zest.

Subscribe with your mail address to get all the recipes straight to your mailbox immediately after publishing.

Video recipe of this fragrant creamy rice

Recipe

Basmati rice – 1 cup

Kaffir lime leaves – 2

Lemon juice – 1 tablespoon

Ginger – 1 inch piece, grated

Green chilli – 1-2, finely chopped

Onion – 1 sliced

Cumin seeds – 1 teaspoon

Green peas – 1/4 cup

Sweet corn – 1/4 cup

Cilantro or coriander leaves – 2-3 tablespoon

Coconut milk – 1 cup

Water – 1 cup

Salt to taste

Oil – 2 tablespoon

Method

1. Rinse the rice 4-5 times or till water runs out clear. Soak the rice in water for 15 minutes. After 15 minutes drain the water and keep aside.

2. Heat oil in a wok. You can also use pressure cooker if you want. Add cumin seeds. When seeds starts to splutter add sliced onion and finely chopped green chilli. Fry till onion becomes translucent.

3. Add grated ginger and fry till onion becomes brown. Onion shouldn’t be burnt.

4. Add green peas and sweet corn. Saute for a minute. Add chopped cilantro or coriander leaves and mix.

5. Add soaked and drained rice. Saute for 2 minutes. Add salt and mix.

6. Add coconut milk and water. If you are using pressure cooker add half cup water. Tear both Kaffir lime leaves into two pieces and add in the rice. Also add lemon juice and mix well. Let it boil.

7. When it starts to rolling boil reduce the heat. Cover and cook on simmer for 10 minutes.

8. After 10 minutes gently stir the rice and cover again. Cook for five minutes on simmer. Now switch off the heat. Remove the cover and fluff the rice gently.

9. Cover again and serve after 10 minutes. Serve aromatic rice with any spicy curry.

Notes

1. You can use lemon zest instead of Kaffir lime leaves.

2. Use any vegetables of your choice.

If you tried my recipe, you can share your food pictures with me in the social network sites by using hashtag #batterupwithsujata.

I would love to hear from you. Please share your thoughts and suggestions in comment.

Please visit my facebook page and hit the like button to get the latest update

Facebook page

Follow on

Twitter

Instagram

Pinterest

Besan Biscuit/ Sugar Free Biscuit

Sugar free besan or chickpea/garbanzo flour biscuit. A delicious, crisp and easy to make biscuit with date powder, pistachio and almond. You don’t need sugar or jaggery to make these biscuits. Little rice flour will make your biscuits perfectly crispy. So here is a healthy and delicious biscuit for your munching time or to serve with tea, coffee or milk.

Already shared many different types of cookies on this blog. Click here for the recipes.

You may also like to try Cardamom nankhatai from me fellow blogger Priya Vijaykrishnan.

Earlier shared besan nankhatai here. But taste of this besan biscuit is totally different. I didn’t use sugar in these biscuits. Date powder will give enough sweetness.

Dates have a low GI, which means they’re less likely to spike your blood sugar levels, making them a safe choice for people with diabetes. Dates boast an impressive nutritional profile and natural sweetness. Because they’re a natural source of fructose, they might be a concern for people with diabetes. However, because they have a low GI and medium GL, they’re safe for those with diabetes in moderation — which translates to no more than 1 to 2 dates at a time. Source

Recipe is very simple. Just add everything to make a smooth dough. I have used shredded almond and pistachios but you can use any dry fruits of your choice. You can also use tutti frutti in the dough if you want.

Subscribe with your mail address to get all the recipes straight to your mailbox immediately after publishing.

Video recipe of this delicious besan biscuit 👇

Recipe

Besan or chickpea flour/garbanzo flour – 1 cup

Rice flour – 3 tablespoon

Dry date powder – little less than 1/2 cup

Butter or ghee/clarified butter – 1/4 cup + 1 tablespoon

Milk – 3-4 tablespoon or as required

Baking powder – 1/2 teaspoon

Milk powder – 1 tablespoon

Cardamom powder – 1/2 teaspoon

Shredded pistachios – 1 tablespoon

Almond – 1 tablespoon, chopped

Method

1. Grease a baking tray or line with parchment paper. Preheat the microwave oven at 170°. Use convection or hot blast function. And for OTG preheat at 180° for 10 minutes.

2. In a bowl mix besan or chickpea flour, rice flour, milk powder, baking powder, cardamom powder and shredded almond. Mix well and keep aside.

3. In a large bowl whisk date powder, ghee or clarified butter and milk.

4. Add all the dry ingredients and mix. Make a smooth dough. Don’t knead much. Add little more milk and 1-2 tablespoon ghee or clarified butter if require to make dough. I had to add little milk and 1 tablespoon ghee more to make smooth dough. Add milk slowly as required.

5. Make small balls and press gently with your palm. Arrange the balls on greased or lined baking tray.

6. Place little shredded pistachios in the middle of the cookies. Press gently with your finger tips. Arrange all the cookies like this.

7. Bake in preheated oven at 170° for 8-10 minutes or till edges becomes light brown. Every oven takes different time. So keep an eye after 8 minutes. Don’t make too brown.

8. Let the cookies cool down completely. Enjoy delicious sugar free cookies immediately or store in airtight container for later use.

I would love to hear from you. Please share your thoughts and suggestions in comment.

Please visit my facebook page and hit the like button to get the latest update

Facebook page

Follow on

Twitter

Instagram

Pinterest

Ghee Or Clarified butter/ How To Make Ghee Easily At Home/ Ghee With Less Residue

Homemade ghee or clarified butter is always best. Here is a very easy method of making ghee. And also sharing the easy method to get more ghee and less residue. And making ghee without burning the pan.

Ghee or clarified butter generally used to tempering dal or rice dishes, in curries, sweets, in Aurvedic medicines and for different religions rituals. To make ghee first we have to churn the milk topping/ malai or cream to make butter. And then we have to cook the butter till clear liquid ghee and brown coloured residue separates.

This ingredient has been used in Indian and Pakistani cultures for thousands of years. When used in place of butter, ghee has several benefits. The differences between ghee and butter Understanding the differences between ghee and butter can help you determine which ingredient to use when cooking. Ghee has a higher smoke point when compared to butter, so it doesn’t burn as quickly. This is perfect for sautéing or frying foods. Butter can smoke and burn at 350°F (177°C), but ghee can withstand heat up to 485°F (252°C). Because ghee separates milk from fat, this butter substitute is lactose-free, making it better than butter if you have allergies or sensitivities to dairy products. Source

I have used cow milk to make ghee. You can see the lovely colour in the pictures. If you are making ghee with Buffalo milk, your ghee will be white. But cow milk ghee looks different. And aroma is heavenly.

Subscribe with your mail address to get all the recipes straight to your mailbox immediately after publishing.

Watch the video recipe below of making ghee.

Recipe

Malai or milk topping/cream

Water

Ice cubes

Method

1. Store malai or milk topping in a container. And keep the container in refrigerator.

2. When you want to make ghee take out the container before an hour. Don’t try to make butter with chilled malai. And don’t keep the butter out of refrigerator for a long time. If the weather is hot, smell of the malai may change if you keep it out of the refrigerator for a long time.

3. After an hour pour the malai or cream in a blender jar. Add half cup normal temperature water and blend till water and butter separates. Watch video above for details.

4. Add some ice cubes in the blender jar and blend again. Now you will get perfect butter. Transfer the butter in a large utensil.

5. Whisk well with your palm. Make round ball of butter and discard the water. If you want you can make paneer with this water. To make paneer, boil it and add vinegar or lemon juice as required. Paneer and whey will separates. Immediately strain the paneer.

6. Rinse the butter with chilled water. Place the butter in a large pan or wok. Heat to just melt the butter. Don’t let it boil. When it starts to boil it will turns into ghee. So be careful heat till the butter starts to melt. When it starts to melt immediately switch off the heat. Keep stirring. Don’t leave unattended.

7. Let the melted butter cool down. Keep it in refrigerator overnight. Next day you will see some water under the solid butter. Drain all the water. This step to get less residue and more ghee.

8. Heat the drained butter again. Keep stirring till liquid ghee and brown residue separates. When residue starts to become brown immediately switch off the heat. Let it cool down a bit. If you leave it on low flame unattended, your utensil may burn from bottom. But if you keep stirring your utensil remains clean. Still if your pan or wok slightly burnt from bottom just boil some water with a teaspoon of baking soda. Now it will be clean easily

9. Strain the ghee with a strainer and store ghee in a glass jar. Use this as required.

I would love to hear from you. Please share your thoughts and suggestions in comment.

Please visit my facebook page and hit the like button to get the latest update

Facebook page

Follow on

Twitter

Instagram

Pinterest

Besan Or Gram Flour Cake / 7 year blog anniversary

Celebrating 7 years blog anniversary today. Seven years with 613 posts. And now its 614. Thanks to all my readers for your constant support, love and encouragement. Its possible only because of you. Now also started YouTube channel. Here is the link https://youtube.com/c/SujataRoy. Please visit and subscribe for video recipes. Hope you will like it. Thanks again.

Eggless besan/gram flour or chickpea flour cake. A super soft and easy to make cake made with very simple and easily available ingredients. Try and enjoy the delectable taste. You will love the aroma and taste. Earlier shared many more eggless cake recipes on this blog. Click here to get the recipes.

This besan cake is very easy to make and taste is absolutely delicious. You can call it a healthy treat. Coconut, cardamom, yogurt and almond will give a wonderful taste and flavour. I always love to use different flours in my bakes. You can get different types of gluten free cakes and cookies on this blog. But never tried besan in my cake. Made besan cookies but not cake. Recently watched a video of Chef Kunal Kapur. Loved the look and texture of the cake. So here is my version of besan cake for my blog anniversary. A big thank to Chef Kunal Kapur.

Subscribe with your mail address to get all the recipes straight to your mailbox immediately after publishing.

Video recipe of this delicious cake

Recipe

Besan- 1 cup

Oil- 1/3 cup

Curd or yogurt- 1/2 cup

Powdered sugar- 1/2 cup

Shredded almond- 2 tablespoon

Desiccated coconut – 2 tablespoon

Milk powder- 1/4 cup

Baking powder- 1 teaspoon

Baking soda- 1/2 teaspoon

Cardamom powder- 1/2 teaspoon

Shredded almond to garnish

Method

1. Sieve besan or chickpea flour, baking powder and soda. Add shredded almond, desiccated coconut and milk powder. Mix everything well. Add cardamom powder and mix.

2. Grease a baking pan. I used loaf pan but you can use round pan or any pan of your choice. Spread some shredded almond in the greased pan. I made it upside down cake. If you don’t want upside down cake skip this step. Spread shredded almond after pouring cake batter in the pan.

3. In a large bowl mix oil, yogurt and powdered sugar. Whisk everything well. Add dry ingredients gradually. Mix well. Make a lump free smooth batter. Watch video recipe for detailed method.

4. Preheat the oven at 170°. Use convection or hot blast mode. For OTG preheat at 180° for 10 minutes.

5. Pour the batter in greased baking pan. Tap the cake pan gently on your kitchen counter to remove the air bubbles. If you are not making upside down cake, then sprinkle shredded almond over the batter.

6. Bake the cake in preheated oven at 170° for 28 minutes or till toothpick comes out clean. Insert a toothpick in the middle of the cake to check. In OTG bake for 30-35 minutes at 180°. Let it cool down completely before slicing.

7. Cut and serve delicious soft moist flavorful besan cake and enjoy the heavenly taste. Happy baking!

If you tried my recipe, you can share your food pictures with me in the social network sites by using hashtag, #batterupwithsujata I would love to see your creations.

I would love to hear from you. Please share your thoughts and suggestions in comment.

Please visit my facebook page and hit the like button to get the latest update

Facebook page

Follow on

Twitter

Instagram

Pinterest

Semolina Or Suji Quesadilla

Semolina or suji quesadilla. You can name it Indian style quesadilla. Quesadilla is a Mexican dish made of tortilla. But here is a breakfast Quesadilla made with suji pancake or our humble suji chilla. A perfect kids friendly breakfast dish. You can make any veg or non veg stuffing instead of potatoes with lots of cheese. Kids will love the taste. 

A quesadilla is a Mexican dish consisting of a tortilla that is filled primarily with cheese, and sometimes meats, spices, and other fillings, and then cooked on a griddle or stove. Traditionally, a corn tortilla is used, but it can also be made with a flour tortilla. A full quesadilla is made with two tortillas that hold a layer of cheese between them. A half is a single tortilla that has been filled with cheese and folded into a half-moon shape. Wikipedia

As I mentioned above you can make any filling of your choice. I have made a creamy stuffing with boiled potatoes, mayonnaise, some sauce, oregano and cheese. You can use any herbs and lots of mozzarella cheese. Your kids will love the taste. You can also use grated vegetables or paneer in the stuffing. You can also use any sauce of your choice instead of pizza sauce.

I like the taste of sriracha sauce but if you don’t have sriracha sauce then you can use any chilli garlic sauce. You can also use leftover roti instead of suji chilla. See the video recipe below of this roti quesadilla. 

Subscribe with your mail address to get all the recipes straight to your mailbox immediately after publishing.

Watch the video recipe below

Recipe

For stuffing

Potato- 4 medium, boiled 

Mayonnaise – 1/3 cup 

Pizza sauce – 3 tablespoon 

Oregano – 1 teaspoon 

Tomato sauce – 2 tablespoon 

Sriracha sauce – 1 tablespoon 

Cheese cube – 2

Salt – 1/4 teaspoon or to taste 

For chila or pancake 

Semolina or suji – 1 cup

Rice flour – 1/2 cup

Curd or yogurt – 1/2 cup 

Salt to taste 

Chilli flakes – 1/2 teaspoon 

Cilantro or coriander leaves – 2-3 tablespoon, chopped 

Water – 1 cup 

Oil as required 

Cheese slices or mozzarella cheese as required 

Method

1. In a large bowl mix suji or semolina, rice flour and curd or yogurt. Add water slowly and mix well. Don’t add entire water in one go. Add 1/4 cup at a time. Mix everything well and make a lump free smooth batter.

2. Now add salt, chilli flakes and chopped cilantro or coriander leaves. Mix well. Cover the bowl and keep aside. 

3. Peel and grate the potatoes. Grate the cheese cubes and mix with potatoes. You can use more cheese cubes if you want.

4. Add salt, oregano, sriracha sauce, mayonnaise, tomato ketchup and pizza sauce. Mix well. Your stuffing is ready.  Taste and adjust the seasoning. Add little more sauce and mayonnaise if required. Add less or more sauce according to your taste.

5. You can use any chilli garlic sauce if you don’t have sriracha sauce. You can add finely chopped onion in potato mixture if you want. You can also make sandwiches with this potato mixture. 

6. Heat a pan or skillet. Brush with little oil. Pour a ladle full of batter in the middle. Spread with the back of the ladle by rotating. Reduce the heat and cook on low heat.  Drizzle little oil on the sides.

7. When the edges becomes brown flip the chila upside down and fry the other side too. Remove the chilla or pancake on a plate. Make one more pancake like this.

8. Spread potato mixture all over the pancake.   Spread small pieces of cheese slice over the potato mixture. You can also use grated mozzarella cheese. Use as much cheese as you like.

9. Place another pancake over it and flip carefully. Drizzle little oil on the sides. Press gently with a spatula. Fry both the sides till golden brown.  Remove on a plate and cut into four pieces with a knife or pizza cutter.  Serve hot with any sauce.

10..You can also use leftover roti instead of chilla or pancake to make this delicious Indian style quesadilla.  Do you have any leftover stuffing? Make sandwiches with it. It will be a delicious sandwich filling.

Notes

1. You can use any flour in chilla or pancake. But don’t skip rice flour. Rice flour will make your quesadilla crisp.

2. You can use any sauce of your choice in stuffing.

3. Grated carrot, capsicum, bell peppers, boiled sweet corn or any vegetable or paneer can be used in stuffing.

4. If your kids love cheesy stuffing then add more cheese. Use as much cheese as you like.

If you tried my recipe, you can share your food pictures with me in the social network sites by using hashtag, #batterupwithsujata I would love to see your creations.

I would love to hear from you. Please share your thoughts and suggestions in comment.

Please visit my facebook page and hit the like button to get the latest update

Facebook page

Follow on

Twitter

Instagram

Pinterest

Peanut Butter

Peanut butter. Here is an easy and quick recipe to make peanut butter at home. Homemade peanut butter is much better than store bought. Its absolutely sugar free, preservative free and delicious. You can make creamy delectable peanut butter easily and you can also customize according to your taste. Add any flavour of your choice.

Recipe is completely vegan and gluten free. Store bought peanut butter contain unhealthy oils and additives. But this homemade peanut butter contains only peanut, salt and very little peanut oil. And peanut oil is completely optional, you can skip it if you want. Earlier shared this recipe with my Multigrain bread post. Now here is a separate post and YouTube video recipe for you. Hope you will like it. Please subscribe my YouTube channel for more video recipes. And don’t forget to click on the bell icon to get all the recipes immediately after uploading. Click on the link below to subscribe. https://youtube.com/c/SujataRoy

Benefits of peanut butter

Peanut butter doesn’t just contribute to weight loss. Consuming peanuts as a regular part of your diet has other benefits, too.

• Peanut butter helps you recover after a workout. It’s high in protein, which you need to boost recovery if you’re going hard at the gym.

• Peanut butter may reduce your risk of diabetes. Because of the low glycemic score of peanuts, consuming peanuts regularly can help keep blood sugar stable and lower your diabetes risk.

• Peanut butter is packed with vitamins and minerals. Copper, folate, B vitamins, and manganese are all right there.

• Peanut butter may reduce your risk of heart disease and other leading causes of death.

To read more health benefits of Peanut butter click here

How to customize according to your taste?

You can use 1 tablespoon honey to make your peanut butter sweet. And you can also make it without any oil or you can use any flavorless oil instead of peanut oil. Yes, you can make it without any oil or use only 1 spoon of oil instead of 2 tablespoon. Choice is your. You can also add chocolate or cocoa powder, mint or any herbs to give different flavour. I am sharing basic recipe. You can make it in different flavour every time.

Subscribe with your mail address to get all the recipes straight to your mailbox immediately after publishing.

Click on the link below and watch video recipe of this healthy and delicious peanut butter

Recipe

Peanut – 1 cup

Sea salt or pink salt – 1/4 teaspoon

Peanut oil – 2 tablespoon, optional

Method

1. Dry roast the peanut on low medium heat till peanut becomes crisp and slightly change it’s colour. Don’t make too brown. And peanut should be roasted well to preserve for a long time.

2. Or microwave on high power for 2 minutes. After one minute stir and press the start button.

3. Take out the peanut and stir well. Microwave again for 1-2 minutes. Every oven takes different time. I had to microwave for 4 minutes. Check and stir after every 1 minute. Don’t make too brown. Check out the video recipe above .After roasting well you can peel the peanut easily.

4. Let the peanut cool down. Take out all the peanut on a kitchen napkin or any cotton cloth. Wrap and rub with your palm to remove the skin of peanut. Separate the peanut and peel.

5. Grind the peanut. Scrap the sides with a spoon or knife and grind again.

6. Now peanut will release oil. You can use it as a spread if you don’t want to use oil.

7. Add 2 tablespoon peanut oil in the grinder jar. If you want your peanut butter slightly sweet add 1 tablespoon honey at this stage. I didn’t. If you are using honey add only 1 tablespoon oil instead of 2 tablespoon. You can also add cocoa powder or chocolate chips or any herbs of your choice. Grind again to make smooth creamy butter.

8. Store the peanut butter in covered container in refrigerator for later use.

Notes

1. Roast the peanut properly for longer shelf life. You can store your homemade peanut butter in refrigerator for a month.

2. Any herbs or chocolate can be added while grinding the peanut. You can try different flavour every time.

If you tried my recipe, you can share your food pictures with me in the social network sites by using hashtag, #batterupwithsujata I would love to see your creations.

I would love to hear from you. Please share your thoughts and suggestions in comment.

Please visit my facebook page and hit the like button to get the latest update

Facebook page

Follow on

Twitter

Instagram

Pinterest

Eggless Mango chia seed cake

Eggless mango chia seed cake with whole wheat flour. You don’t need refined flour or maida, egg and butter to make this delicious cake. Yes a butter free cake with mango and chia seeds. Cake is super soft, moist and very easy to make.

We normally use chia seeds in our smoothie or overnight oats now try a cake with these nutritious chia seeds.

Chia seeds may be small, but they’re incredibly rich in nutrients. A staple in the ancient Aztec and Maya diets, these seeds have been touted for their health benefits for centuries. The antioxidants, minerals, fiber, and omega-3 fatty acids in chia seeds may promote heart health, support strong bones, and improve blood sugar management. Source

But chia seeds are completely optional. If you don’t like the taste, you can skip chia seeds. And if you are not using chia seeds then you need less milk for the batter. Because chia seeds soak lots of moisture.

You can always use refined flour/all purpose flour or maida instead of whole wheat flour if you want. And you can also make this cake with any fresh fruit of your choice. Already shared one more Fresh fruit cake with carrot here.

Subscribe with your mail address to get all the recipes straight to your mailbox immediately after publishing.

Video recipe of this healthy and delicious cake

Recipe

Whole wheat flour or atta – 1&1/2 cup

Mango puree – 1 cup

Chia seeds – 2 tablespoon

Powdered sugar – 3/4 cup

Milk powder – 1/4 cup

Baking powder – 1 teaspoon

Baking soda – 1/2 teaspoon

Thick curd or yogurt – 1/4 cup

Milk – 3/4 cup

Oil – 1/2 cup

Vanilla essence – 1 teaspoon

Method

1. Preheat the microwave convection or hot blast mode at 170°. For OTG preheat at 180°.

2. Grease a baking pan. I used loaf pan and some cupcake moulds. You can use any cake pan or make cupcakes in muffins or cupcake moulds.

3. In a bowl mix flour, baking powder and soda. Grind the mango pieces to make puree. Take out the mango puree in a bowl.

4. In the same mixer grinder jar blend half of the milk and chia seeds. Chia seeds are optional, you can skip if you don’t like the taste.

5. In a large bowl add blended chia seeds and milk with sugar. If you are not using chia seeds add only milk. And also reduce the milk. Use only half cup.

6. Now add oil and curd or yogurt. Whisk well. Add vanilla essence, remaining milk and milk powder. Whisk again.

7. Add mango puree and mix. Add half of the dry ingredients and mix well. Add remaining dry ingredients and mix to make a lump free smooth batter.

8. Pour the batter in baking pan or cupcake moulds. Fill upto 3/4 pan or moulds. Tap gently to remove air bubbles.

9. Bake in preheated oven at 170° for 28-30 minutes. For OTG bake for 35-40 minutes. Check with a toothpick after 28 minutes. Fresh fruit cake takes longer time to bake. My cupcakes are perfectly baked in 28 minutes. But I had to bake the cake in loaf pan for 4 minutes again. Every oven takes different time so check after 28-30 minutes.

10. Let the cake cool down. Run a knife at the edges. Demould on a plate. Slice and enjoy the healthy and delicious mango chia whole wheat cake. Happy baking. Stay safe healthy and blessed.

Notes

1. You can use refined flour or maida instead of whole wheat flour.

2. If you are not using chia seeds then use less milk for the batter.

If you tried my recipe, you can share your food pictures with me in the social network sites by using hashtag, #batterupwithsujata I would love to see your creations. I would love to hear from you. Please share your thoughts and suggestions in comment.

Please visit my facebook page and hit the like button to get the latest update

Facebook page

Please subscribe my YouTube channel for more recipes

Follow on

Twitter

Instagram

Pinterest

Watch “Sujata Roy” on YouTube

https://youtube.com/channel/UCuAk8k5GnN6U_b5TEGe6sUQ

I would like to thank all my readers, followers, friends and relatives for all the support, love and encouragement. Here is my newly started YouTube channel. Posted the link above 👆. Hope you will like it.

Please subscribe the channel and click on bell icon to get all the recipes immediately after uploading. And also like and share if you like the recipes. Your one like will encourage me to share more interesting recipes.

If you want any recipe from this blog in YouTube video please let me know in comment. Thank you everyone for being with me on this journey.

I would love to hear from you. Please share your thoughts and suggestions in comment.


Please visit my facebook page and hit the like button to get the latest update

Facebook page


Follow on

Twitter

Instagram

Pinterest

Pahadi Mutton

Today sharing delicious pahadi mutton recipe from a restaurant chef. Pahadi mutton is very easy to make yet taste is scrumptious.

You may like two more mutton recipes from this blog.

1. Rara mutton

2. Railway mutton curry

As I mentioned above recipe is very simple and easy to follow. Please watch the YouTube video recipe to know all the process of chef Jeevan.

Subscribe with your mail address to get all the recipes straight to your mailbox immediately after publishing.

To watch video recipe of this lipsmackingly delicious pahadi mutton curry and some glimpses of the beautiful hills and lakes of Uttarakhand click on the link below 👇

Recipe

Mutton – 1 kg

Onion – 1 kg, peeled and sliced

Ginger – 2 inch piece, julienne

Garlic – 1 whole bulb, finely chopped

Green chilli – 4, chopped

Black cardamom – 2

Cumin – 1 teaspoon

Bay leaf – 2

Black pepper – 1 teaspoon

Cloves – 1/2 teaspoon

Oil – 1/2 cup

Salt to taste

Tomato – 4 large, ground

Coriander powder – 1&1/2 tablespoon

Turmeric powder – 1/2 teaspoon

Garam masala powder – 1 teaspoon

Kashmiri red chilli powder – 1&1/2 tablespoon

Red chilli powder – 1 tablespoon

Kitchen king masala – 1 tablespoon

Water – 2-3 cup

Cilantro or coriander leaves – 1/2 cup, chopped

Method

1. Clean, wash and drain the mutton pieces.

2. Heat oil in a pan or wok. Add cumin seeds,,whole black cardamom, cloves and black pepper. You can use 1/2 teaspoon black pepper instead of 1 teaspoon if you want. Use according to your taste.

3. Add chopped garlic and fry for a minute. Now add sliced onion, chopped green chilli and ginger julienne. Fry till onion becomes translucent.

4. Add Kashmiri red chilli powder and tomato paste saute for a minute. Add red chilli powder, turmeric powder, garam masala powder, kitchen king masala and coriander powder. Kitchen king masala is optional. You can skip or you can also use mutton masala, chicken masala etc. Saute till oil leaves the sides.

5. Add mutton and salt. Saute till everything dried up and oil separates. Add 2 cup water, mix and cover. Cook on simmer for 4 minutes.

6. Transfer the mutton to a pressure cooker with 1 cup water and chopped cilantro or coriander leaves. Pressure cook on simmer for 4-5 whistle.

7. Let the pressure settle down on its own. Garnish with cilantro or coriander leaves, ginger julienne and onion rings. Serve with steamed rice, jeera rice, pulao, roti, tandoori roti, naan, paratha or any bread.

If you tried my recipe, you can share your food pictures with me in the social network sites by using hashtag, #batterupwithsujata I would love to see your creations.

I would love to hear from you. Please share your thoughts and suggestions in comment.

Please visit my facebook page and hit the like button to get all the latest update.

Facebook

Follow on

Twitter

Instagram

Pinterest