Tomato Saar

Tomato saar.
Delicious spicy curry with ripe tomatoes from Maharashtra cuisine.

According to Wikipedia Maharashtra is the name of a state of India and its language is Marathi. In area it is the third-biggest state of India. Mumbai is the capital of Maharashtra. Pune is the cultural and educational capital.
The food of Maharashtra is different in each place. The people in the Konkan region eat more rice and the ones near the ocean eat a lot of fish. In eastern Maharashtra, most people eat a lot of wheat, jowar, and bajra. Other important things people eat in Maharashtra are lentils, onions, tomatoes, potatoes, chilies, garlic, ginger, and aamras. Many people also eat chicken and mutton.

Tomato is known scientifically as Solanum lycopersicum, the tomato is the berry of a plant from the nightshade family, native to South America. Despite technically being a fruit, the tomato is generally categorized as a vegetable.

Tomatoes are the major dietary source of the antioxidant lycopene, which has been linked to many health benefits, including reduced risk of heart disease and cancer.

They are also a great source of vitamin C, potassium, folate and vitamin K.
Source

This month in Shhhhh cooking secretly challenge facebook group we are sharing different dishes from Maharashtra cuisine. In this group members are paired up every month. And the pairs give each other two secret ingredients. This month my partner is Priya Mahesh. Who blog at Www.at200deg.com
Priya gave me two easy to use ingredients hing or asafoetida and jeera or cumin. And I gave her turmeric and ginger. Check out her blog for the amazing recipe she shared with these ingredients.

You may like some more tomato recipes here

Marinara sauce

Tomato coconut chickpea curry

Onion tomato chutney or dip

Tomato cilantro egg drop soup

Bitter gourd with tomato

This tomato saar goes well with hot steamed rice. I have added kokum in it. I love the mild tangy taste of kokum. But if you don’t have kokum, use tamarind paste or you can skip it if you don’t like tangy taste.

Recipe

Tomato – 4 medium

Water – 2 cup

Ginger – 1/2 inch piece

Green chilli – 2

Cumin powder – 1 teaspoon

Coconut – 1/2 cup, finely chopped or grated

Oil – 2 tablespoon

Mustard seeds – 1/2 teaspoon

Cumin seeds – 1/2 teaspoon

Curry leaves – 12

Dry red chilli – 1

Hing or asafoetida – a pinch

Turmeric powder – 1/4 teaspoon

Jaggery powder or sugar – 1/2 teaspoon

Kokum – 2 – 3 pieces, optional

Cilantro or coriander leaves – 1 tablespoon, chopped + to garnish

Method

1. Wash the tomatoes well. Make a cross-shaped incision or make X with a knife at one end. Don’t make too deep cut.

2. Boil 2 cup water in a pan. Add the tomatoes in it. Boil for 6 – 8 minutes or until the skin starts to separate. Don’t discard the water we will use it.

3. Let the tomatoes cool down. Discard the stem. Peel and grind into a smooth paste.

4. Grind the coconut, green chilli and ginger. Make a smooth paste. You can add 2 – 3 garlic cloves if you want. I didn’t.

5. Add cumin powder and keep aside. If you are using whole cumin add it with coconut, chilli and ginger and grind.

6. Heat oil in a pan. Add mustard seeds.

7. When the seeds start to splutter add cumin seeds and let them splutter.

8. Add dry red chilli. Now add hing or asafoetida and curry leaves.

9. Add coconut, chilli, ginger, cumin paste and turmeric powder. Mix well.

10. Saute till the mixture dried up.

11. Add ground tomatoes, salt, kokum and chopped cilantro or coriander leaves. Mix well.

12. Add the water we have used to boil tomatoes. When it starts to rolling boil reduce the heat. Cook on simmer for 10 minutes.

13. Remove from heat. Garnish with coriander leaves.

14. Serve hot with steamed rice.

Notes

1. Add green chilli according to your taste.
2. If you don’t have kokum then you can use 1 teaspoon tamarind paste or if you don’t like tangy taste skip it.
3. Use fully ripe red tomatoes to make tomato saar.

If you tried my recipe, you can share your food pictures with me in the social network sites by using hash tag, #batterupwithsujata
I would love to see your creations.

I would love to hear from you. Please share your thoughts and suggestions in comment.
Please visit my facebook page and hit the like button to get the latest update
Facebook page
Follow on
Twitter

Instagram

Google plus

Khoa Or Dried Milk And Paneer Or Cottage Cheese / Easy Method

In many of my recipes I have mentioned about khoya or dried milk and paneer/cottage cheese or chhena. Today I am sharing easy method to make both khoya and chhena. I will try to add step by step picture later.

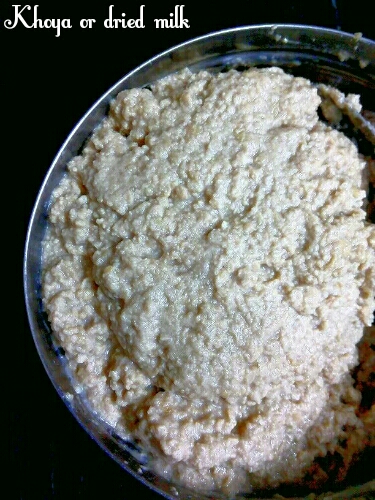
Khoya or dried milk

2 litter milk

Method

1. Boil the milk in a heavy bottom pan.

2. Let the milk cook on low flame. Stir occasionally.

3. Scrape the sides to avoid burning.

4. Milk will be changed into a thick mass. Like this 👇

5. It can take 2 to 2:30 hours.

6. After reducing I have got 1 and 1/2 cup tightly packed khoya/mawa or dried milk from 2 litter milk.

Paneer Or Cottage Cheese

Milk – 1 litre

Lemon juice or vinegar -3 – 4

tablespoon or as require

Method

1. Place a cheesecloth on a strainer.

2. Heat milk in a heavy bottom pan. When it starts to rolling boil remove from heat. Add lemon juice or vinegar.

3. Add 1 tablespoon at a time. Stir and add 1 tablespoon more or as require to curdle the milk completely.

4. When greenish whey and cottage cheese separates immediately pour into the strainer.

5. You can make cottage cheese with curd in same method. First add 1/4 cup curd then add as require. It will depends on the milk. You need 1/4 to 1/2 cup curd to make cottage cheese.

6. Squeeze the cloth well to drain all the water from cottage cheese.

7. Remove the cottage cheese on a large dry cloth. Wrap well and put a heavy weight on it for 2 hours.

8. Now paneer or cottage cheese will be look like this 👇

9. This cottage cheese can be use to make curry, stuffing for paratha, cutlets or make different kinds of sweets.

If you tried my recipe, you can share your food pictures with me in the social network sites by using hash tag, #batterupwithsujata
I would love to see your creations.

I would love to hear from you. Please share your thoughts and suggestions in comment.
Please visit my facebook page and hit the like button to get the latest update
Facebook page
Follow on
Twitter

Instagram

Google plus

Rosti Or Swiss Potato Pancake

IMG_20181124_135306_20181124211607947.jpg


Rosti or you can call it potato pancake. Easy to make and perfect for breakfast or side dish.

According to Wikipedia
Rösti or röschti is a Swiss dish consisting mainly of potatoes, in the style of a fritter. It was originally a breakfast dish, commonly eaten by farmers in the canton of Bern, but is now eaten all over Switzerland and around the world. The French name röstis bernois makes direct reference to the origins of the dish.

This week our 172 #Foodiemonday bloghop theme is #InternationalFeast.
This week Mayuri Patel who blog at Mayuri’s Jikoni suggested the theme.
Mayuri suggested World Cuisine for this week. So the country we have to choose a dish from to make should begin with our name’s first letter. Interesting isn’t it ☺️

I have chosen beautiful country Switzerland famous for it’s chocolate. And the dish name is Rosti begin with the first letter of my nick name ha ha no its not in the rule but when I was searching for recipes noticed this easy to make potato pancake rosti. I loved the recipe.

Adopted the recipe from
the spruce Eats. This Swiss rosti recipe is very simple. You can add onion, parsley paprika, nutmeg etc.
But I have made it with only salt and pepper. Next time I will try with green chilli, cilantro and some Indian spices. I am sure it will be also taste great with any seasoning.
I have tried to make it little thin but if you want to make perfect round shaped rosti follow the exact recipe.

Recipe credit – the spruce Eats

Recipe

Potatoes – 4

Salt – 1 & 1/2 teaspoon

Black pepper powder – 1/2 teaspoon or to taste

Olive oil or butter – 3 – 4 tablespoon

Method

1. Peel and wash the potatoes.

2. Grate the potatoes. Use a grater with big holes. Fine grater would make your potatoes mushy.

3. Add 1 teaspoon salt in the grated potatoes and mix well. Keep aside for 5 – 6 minutes.

4. Take a fistful grated potato, press tightly and squeeze well. This way squeeze all the grated potatoes and place in a bowl.

5. Add 1/2 teaspoon salt and black pepper. Mix well. You can add ground paprika, finely chopped onion or parsley. Or add chopped green chilli, chaat masala, cumin powder and handful chopped coriander leaves or cilantro.

6. Heat half of the oil or butter in a pan. You can also use any vegetable oil. When the oil becomes hot, add grated potatoes in it. Add small amount at a time. Add potatoes about 1 inch deep. Add the potatoes till the bottom part of the pan fully covered.

7. Cook on medium heat. Stir and cook for a minute with a spatula to coat the potatoes with olive oil or butter.

9. Spread the potatoes in the pan and press with a spatula.

10. Press gently with spatula to make the layer evenly. Cook on medium heat.

11. Cook for 10 minutes. Now cover and cook again for 5 – 10 minutes or till the bottom part becomes golden brown.

12. Now place a plate on the top of the pan and transfer it on the plate.

13. Add remaining oil or butter in the pan. When it becomes enough hot slide potato pancake in the pan cooked side up. Press down with a spatula.

14. Cook it for about 15 minutes or until the bottom side becomes golden brown. You can make small sized rosti if you like. I have made one small individual sized.

15. Swiss potato rosti is ready to serve. Transfer the rosti on a plate. Sprinkle salt and pepper if require.

14. Slice and serve hot.

Notes

1. You can boil and peel the potatoes and refrigerate overnight. Next day grate just before making rosti.

2. You can add finely chopped onion and green chilli with grated potatoes if you like.

If you tried my recipe, you can share your food pictures with me in the social network sites by using hash tag, #batterupwithsujata
I would love to see your creations.

I would love to hear from you. Please share your thoughts and suggestions in comment.

Please visit my facebook page and hit the like button to get the latest update
Facebook page
Follow on
Twitter

Instagram

Google plus

Lemon Rosemary Pasta

Pasta with rosemary, oregano, tomato and lemon.

Bored with white sauce pasta? Then try this lemony pasta this time.
Very delicious and aromatic pasta. Lemon and rosemary mixed flavour made it’s taste lip-smacking.

Lemony taste blend with rosemary, oregano and tomato makes the taste awesome.
I have used penne pasta but you can use elbow or any pasta. You can use Basil or any herb of your choice.

Recipe

Penne pasta – 110 gram, boiled

Tomato – 2

Garlic – 4-5

Onion – 1, thinly sliced

Grated ginger – 1 teaspoon

Salt – 1/2 teaspoon or to taste

Dried rosemary – 1 teaspoon

Oregano – 2 teaspoon

Lemon juice – 1 & 1/2 tablespoon

Lemon zest – 1/4 teaspoon

Black pepper powder – 1 teaspoon or to taste

Red chilli flakes – 1/2 teaspoon or to taste

Olive oil or butter – 3 – 4 tablespoon

Sliced almonds to garnish

Method

1. Grind the tomatoes with garlic.

2. Dry roast sliced almonds and keep aside.

3. Heat oil or butter in a pan. Add sliced onion.

4. When the onion starts to change it’s colour into light brown add grated ginger. Fry for few seconds.

5. Add ground tomatoes and garlic. Saute till oil leaves the sides and raw smell of garlic goes away.

6. Add rosemary, oregano, salt black pepper powder and chilli flakes. Saute for few seconds. You can little water from boiled pasta if you feel it too dry.

7. Add lemon juice and lemon zest. Mix well.

8. Add boiled pasta and toss till everything mixed and coated well. You can add little more water if require.

9. Taste and adjust the seasoning. Remove from heat.

10. Garnish with toasted sliced almonds. Serve hot.

Notes

1. You can use Basil or any herb of your choice.

2. Add black pepper and chilli flakes according to your taste.

3. You can use penne, elbow or any pasta.

If you tried my recipe, you can share your food pictures with me in the social network sites by using hash tag, #batterupwithsujata
I would love to see your creations.

I would love to hear from you. Please share your thoughts and suggestions in comment.
Please visit my facebook page and hit the like button to get the latest update
Facebook page
Follow on
Twitter
Instagram

Google plus

Spinach Curry With Corn soya chunks, Coconut And Almond

Spinach curry with sweet corn, soya chunks, coconut and almond.
A delicious creamy thick curry. You can serve it with any bread. Easy to make and perfect side dish for your lunch or dinner.

In my earlier posts we have discussed about the health benefits of spinach, corn and soya chunks. So this time talking about only taste. This lip-smacking curry is lightly flavoured with cardamom, cinnamon and cloves. Almonds made the curry thick and creamy. You can use cashew nuts instead.
You may like some more spinach recipes here.

1. Dal palak

2. Palak raita

3. Green gram carrot spinach soup

4. Spinach carrot bean beet and almond soup

5. Dairy free green smoothie

6. Zan

Our this week’s 171 #Foodiemonday bloghop theme is #saagsaga. Kriti suggested this beautiful theme. We have to share any leafy green or saag recipe. My contribution is this delicious spinach curry with corn, soya chunks, coconut and almond.

Lip-smacking spinach curry with all the goodness of sweet corn, soya, coconut and almond.

Recipe

Spinach or palak – 200 gram

Sweet corn – 1 cup, boiled

Soya chunks – 1/2 cup

Onion – 1, finely chopped

Tomato – 2, chopped

Garlic – 3 – 4 cloves

Ginger – 1 inch piece

Green chilli – 2 – 3

Coconut – 3 tablespoon, grated or finely chopped

Almond – 13 – 14

Green cardamom – 2

Cinnamon – 1/2 inch piece

Cloves – 2

Cumin powder – 1 teaspoon

Coriander powder – 1/2 teaspoon

Turmeric powder – 1/4 teaspoon

Garam masala powder – 1/2 teaspoon

Salt to taste

Oil – 2 – 3 tablespoon

Method

1. Clean and wash the spinach. Discard the stem. Take the leaves only.

2. Heat 3 cup water with 1/4 teaspoon salt in a pan.
When it starts to rolling boil add spinach leaves in it.

3. Boil for 2 – 3 minutes. Switch off the heat and immediately drain the water.

4. Keep ice cold water ready. Dip the spinach in ice cold water immediately to retain the green colour.

5. Grind the spinach into a smooth paste. Add very little water if require.

6. Soak almonds in hot water or microwave for 1 minute with little water.

7. Let it cool down. Peel and keep aside.

8. Boil the soya chunks with 2 cup water and 1/2 teaspoon salt. Boil for 1 – 2 minutes.

9. When it cool down drain the water, squeeze and wash with fresh water.
Squeeze well and keep aside.

10. Grind peeled almonds, tomato, green chilli, garlic, coconut, green cardamom, cinnamon and cloves. Make a smooth paste.

11. Heat 2 tablespoon oil in a pan. You can use butter or half oil half butter.

12. Add finely chopped onion. Fry the onion till onion becomes light brown.

13. Now add almond, coconut, ginger, garlic, chilli, tomato, cardamom, cinnamon and cloves paste.

14. Saute and add salt, cumin powder, coriander powder, turmeric powder and garam masala powder. Saute till the mixture dried up and leaves oil.

15. Add squeezed soya chunks and mix well. Saute for 1 minute more and add boiled sweet corn.

16. Mix well and add spinach puree.
Add 1 cup water and mix well.

17. When it starts to boil reduce the heat. Cook on simmer for 6 – 7 minutes. Stir occasionally.

18. Taste and adjust the seasoning. You can add 1/4 cup water if the gravy is too thick but don’t add more.

19. If you are adding water boil for few seconds on high heat.

20. Remove from heat. You can add 1 – 2 tablespoon cream if you want. I didn’t.

21. Your spinach curry with corn, soya chunks and coconut is ready. Garnish with boiled sweet corn, tomato and onion slices.

22. Serve hot with pulao, jeera rice, steamed rice, roti, paratha, puri, naan, tandoori roti, crisp toasted bread or any bread.
Happy cooking!!

Notes

1. Add chilli according to your taste. Add 1 green chilli or skip the chilli if you are making it for kids. Or add more green chilli if you want your curry more spicy.
2. You can use cashew nuts instead of almonds.
3. You can also add paneer or cottage cheese pieces in the curry. Or you can use paneer or mushrooms instead of corn and soya chunks.
4. You can use butter instead of oil, add little oil with butter to avoid burning.
5. If you like you can add 1/4 to 1/2 teaspoon crushed kasuri methi or dried fenugreek leaves at the end.

If you tried my recipe, you can share your food pictures with me in the social network sites by using hash tag, #batterupwithsujata
I would love to see your creations.

I would love to hear from you. Please share your thoughts and suggestions in comment.

Please visit my facebook page and hit the like button to get the latest update
Facebook page
Follow on
Twitter

Instagram

Google plus

Goan Dal Curry With Coconut And Kokum

Dal curry with coconut and kokum.
A delicious and flavourful dal from Goan cuisine.

Beautiful state Goa known as “Pearl of the Orient” and a “Tourist Paradise”. The state famous for it’s beaches.
Goan cuisine consists of regional foods popular in Goa, an Indian state located along India’s west coast on the shore of the Arabian Sea. Rice, seafood, coconut, vegetables, meat, pork and local spices are some of the main ingredients in Goan cuisine. The area is located in a tropical climate, which means that spices and flavors are intense. Use of kokum is another distinct feature. Goan food is considered incomplete without fish. It is similar to Malvani or Konkani cuisine.
To read more about Goa click here.

Among all the food this dal curry is my all time favourite.
You can get some more dal recipes here

1. Dal kanda or dry chana dal fry

2. Beetroot dal

3. Whole Masoor dal or red lentils

4. Dal palak

5. Assamese massor dal boror tenga

6. Sprouts sundal

7. Egg dal tadka

We don’t get kokum in local market. Earlier used tamarind paste instead of kokum. But this time my daughter gave me a packet of kokum from Pune.
If you don’t have kokum then you can use 2 teaspoon tamarind paste instead.
I didn’t use onion in the dal. If you want you can fry 1 sliced onion before adding coconut and tomato paste. Or you can grind 1 onion with coconut, chilli, ginger, garlic and tomato.

You can make it with any dal or lentil like moong or green gram, Masoor dal

or chana dal or Bengal gram.
Recipe is very simple and easy yet lip-smacking. Best accompany with your steamed rice or any bread.

Recipe

Toor dal or pigeon peas – 1 cup

Turmeric powder – 1/2 teaspoon

Salt to taste

Water – 2 & 1/2 cup + 1 cup

Kokum – 1 – 2 pieces

Cilantro or coriander leaves – 2 tablespoon, chopped

Ginger – 1/2 inch piece, chopped

Green chilli – 1 – 2, chopped

Fresh coconut – 1/2 cup, chopped

Tomato – 2, chopped

Garlic – 3 – 4 cloves

Cumin powder – 1 teaspoon

Oil – 2 tablespoon

Curry leaves – 12 – 15

Mustard seeds – 1/2 teaspoon

Cumin seeds – 1 teaspoon

Dry red chilli – 2, torn into 2 pieces

Hing or asafoetida – a pinch

Method

1. Clean and wash the toor dal or pigeon peas. Soak in water for 15 – 30 minutes.

2. Grind coconut pieces, green chilli, tomatoes, ginger and garlic. Make a smooth paste. You can add 1 onion if you want.

3. Boil the soaked dal with 2 & 1/2 cup water in pressure cooker for 3 – 4 whistle or till the dal becomes soft.

4. When the pressure cooker cool down, open the lid.
Add kokum pieces and 2 tablespoon chopped cilantro or coriander leaves. Mix and keep aside.

5. Heat 1 tablespoon oil in a pan.
Add the ground paste and cumin powder.

6. Saute till the mixture dried up and smell of raw garlic goes away, add it to the dal.

7. Mix well. Add 1 cup water.
When it starts to rolling boil simmer the heat.

8. Cook on low heat for 5 – 6 minutes.
Stir in between to avoid sticking at the bottom of the pan.

9. Taste and adjust salt if require. You can add little more water if require. But don’t make the dal runny. It should be thick.

10.Switch off the heat.

11. Now heat 1 tablespoon oil or ghee in a small pan.

12. Add mustard seeds. Let them splutter now add cumin seeds.

13. When the seeds starts to splutter add dry red chilli and curry leaves.
Add hing or asafoetida and mix.

14. Add this tempering in the dal.
Mix well. Garnish with chopped cilantro or coriander leaves.

15. Serve hot with steamed rice, roti, paratha, puri, naan or any bread.

Notes

1. You can use moong, masoor, chana or any dal instead of toor dal.

2. If you don’t have kokum use 1 – 2 teaspoon tamarind paste instead.

3. Use chilli according to your taste.

Sending this post to ‘My Legume Love Affair’ hosted by

Cook with Renu 

http://thewellseasonedcook.blogspot.com/?m=1
and
https://foodandspice.blogspot.com/?m=1

received_2146053782390536.jpeg
Enter a caption

If you tried my recipe, you can share your food pictures with me in the social network sites by using hash tag, #batterupwithsujata
I would love to see your creations.

I would love to hear from you. Please share your thoughts and suggestions in comment.

Please visit my facebook page and hit the like button to get the latest update
Facebook page

Follow on
Twitter

Instagram

Google plus

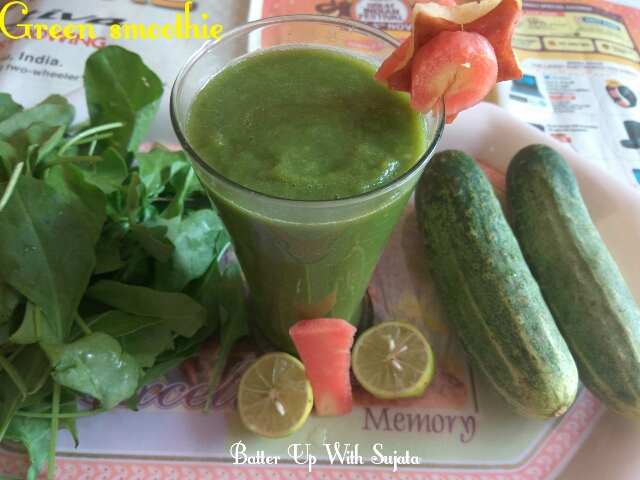
Green Smoothie / Dairy Free Smoothie

Green smoothie or detox drink.
Hope you enjoyed the festival of light. Enjoyed all the festive goodies, sweets and different kinds of delicacies. Right?
Now we have to detoxify our body and shed those unwanted weight.
Detox drink helps to flush out toxins and improve metabolism. Not only weight loss detox drink will make your skin glow.

This green smoothie has baby spinach, carrot, orange, apple, cucumber, ginger and lemon juice. Carrot orange and apple made the smoothie enough sweet so you don’t have to add any sweetener. But if you want your smoothie salty then you can add rock salt or black salt and black pepper powder.

You can get some more smoothie recipes with different taste and flavour here. Click on the name below to get recipe.

1. Dairy free mango pineapple smoothie

2. Watermelon cantaloupe mint smoothie

3. Mango peach pear smoothie

4. Beetroot smoothie

5. Banana almond mint smoothie

6. Savoury cucumber smoothie or chhach

7. Guava banana smoothie

8. Cucumber apple smoothie

9. Cottage cheese and mango smoothie

10. Litchi watermelon date peach Tulsi and almond smoothie

11. Muskmelon orange coconut smoothie

12. Mango banana smoothie

13. Apple orange banana grape carrot smoothie

14. Pomegranate apple banana smoothie

15. Coffee banana chocolate smoothie

16. Papaya orange smoothie

17. Papaya smoothie

18. Dairy free smoothie

19. Apple almond raisin smoothie

20. Smoothie with green tea

21. Mango coconut flax seed smoothie

Sending this post to 170 #Foodiemonday bloghop #detox recipe theme.

Spinach apple orange and cucumber will make your smoothie delicious and enough sweet. Just blend everything and enjoy. If you don’t like ginger skip it.

Popeye’s favorite, spinach, contains a whopping 166 milligrams of glutathione per serving when eaten raw. Cook it, and it all goes away. Spinach also contains twice as much energy-boosting iron as other leafy greens. Spinach has also gained a lot of attention as a cancer-fighter, too.

Carrots are another food rich in glutathione, a protein that helps detoxify the liver. In addition to the detox properties, carrots contain good amounts of vitamin C, B6 and potassium. They also loaded with vitamin A and K, too! It’s best to eat these raw.
Source

You can use any fruit of your choice. Fruit gives sweetness and enhance the taste of your smoothie.

Recipe

Tender baby spinach – 1 cup

Carrot – 1

Orange – 1

Apple – 1

Cucumber – 1

Grated ginger – 1/2 teaspoon, optional

Lemon juice – 1 teaspoon

Method

1. Clean, wash and chop the baby spinach.

2. Peel and chop the carrot and cucumber. Taste the cucumber. It shouldn’t be bitter.

3. Peel the orange and discard the seeds.

4. Peel, core and chop the apple.

5. Now blend everything in a blender till smooth.

6. You can add honey if you want. Or add rock salt or black salt and black pepper powder. Add the seasoning according to your taste.

7. Pour the mixture into your favourite glass and enjoy.

If you want your drink chilled then you can add some ice cubes in it.

Notes

1. Ginger is optional, if you don’t like gingery taste then you can omit it.

2. If you want your drink chilled use frozen fruits or add some ice cubes.

3. You can add grape, kiwi or any fruit of your choice.

4. You can add 1 tablespoon flax seed powder in it.

If you tried my recipe, you can share your food pictures with me in the social network sites by using hash tag, #batterupwithsujata
I would love to see your creations.

I would love to hear from you. Please share your thoughts and suggestions in comment.
Please visit my facebook page and hit the like button to get the latest update
Facebook page
Follow on
Twitter

Instagram

Google plus

Chicken Kosha With Whole Garlic And Potatoes

Chicken kosha.
Chicken or mutton kosha is a famous dish of Bengal. You can make this curry with mutton, eggs or any vegetables.
Kosha means bhuna or saute. You have to fry chicken with onion, garlic, tomato and spices on low flame till done. Need lots of patience but the result will be lip-smacking and flavourful.
Posting a non veg dish after a long time. Some of my blog reader requested for a spicy chicken. So here is a delicious mouthwatering dry chicken curry for you. Hope you will like it.

You can get some more chicken and mutton dishes here

1. Zafrani chicken

2. Chicken dak bungalow

3. Chicken chaap

4. Rara mutton

5. Railway mutton curry

If you want your chicken less spicy decrease the amount of chilli but if you want it hot increase green chilli or you can add 1 – 2 teaspoon hot variety red chilli powder in the curry.

I have added potatoes and whole garlic in it. But its optional. You can skip whole garlic if you want. And if you love the taste of garlic then I am sure you will love this curry with whole garlic. If you want you can also make it without potatoes.

Recipe

For marination

Chicken – 500 gram

Ginger garlic paste – 1 tablespoon

Turmeric powder – 1/4 teaspoon

Cumin powder – 1 teaspoon

Thick yogurt – 1/2 cup

Lemon juice – 1 tablespoon

Mustard oil – 1 tablespoon

Salt – 1/2 teaspoon

Red chilli powder – 1 teaspoon

Black pepper powder – 1/2 teaspoon

For curry

Onion – 3, thinly sliced

Tomato – 3 chopped

Ginger – 1 inch piece, grated

Garlic – 10 cloves, minced

Green chilli – 3 – 4 or to taste, chopped

Whole garlic – 2-3, optional

Potatoes – 2, optional

Cumin powder – 1 teaspoon

Coriander powder – 1 teaspoon

Turmeric powder – 1/2 teaspoon

Salt to taste

Kashmiri red chilli powder – 1 tablespoon

Garam masala powder – 1/2 teaspoon

Sugar – 1/2 teaspoon

Green cardamom – 3 – 4, crushed

Cinnamon – 1 inch piece

Clove – 3 – 4

Bay leaf – 2

Oil – 1/2 cup

Hot water – 1 cup

Method

1. Clean and wash the chicken pieces. Marinate with ginger garlic paste, turmeric powder, cumin powder, thick yoghurt, lemon juice, mustard oil, salt, red chilli powder and black pepper powder.

2. Cover and keep in refrigerator for at least 2 hours or overnight.

3. Peel and cut the potatoes into half. Wash, drain and keep aside.

4. Peel the outer layer of the garlic and wash well.

5. Thinly slice the onions.

6. Heat oil in a pan. Fry the potatoes until light golden brown, remove from oil and keep aside.

7. Add crushed green cardamom, cinnamon, cloves and bay leaf in the oil.

8. Now add sugar and sliced onions. Caramelised sugar will give the curry perfect colour so don’t skip it.

9. Fry for a couple of minutes and add minced garlic, green chilli and grated ginger.
Fry till onions becomes light brown and raw smell of garlic goes away.

10. Add the chopped tomatoes, cumin powder, turmeric powder, coriander powder, kashmiri red chilli powder and garam masala powder. If you want your curry hot add 1 – 2 teaspoon hot variety red chilli powder. Fry till the tomatoes becomes mushy.

11. Add marinated chicken pieces along with its spices. Mix well.
Cover and cook on low medium heat. Stir in between to avoid sticking at the bottom.

12. After 10 – 15 minutes add fried potatoes and whole garlic. Mix well. If you like you can omit the garlic or potatoes.

13. Again cover cook on low flame. Stir in between.

14. When oil leaves the sides add hot water and cook till everything becomes soft.

When chicken and potato pieces becomes soft cook on high heat till you get your desired consistency. Curry should be almost dry.

Serve hot with pulao, fried rice, roti, paratha, puri, luchi, naan, steamed rice or any Indian bread or rice dishes.

Notes

1. If you like you can omit whole garlic. Potatoes are also optional.
2. Add chilli according to your taste. You can increase the green and red chilli if you want your curry more spicy.

If you tried my recipe, you can share your food pictures with me in the social network sites by using hash tag, #batterupwithsujata
I would love to see your creations.

I would love to hear from you. Please share your thoughts and suggestions in comment.
Please visit my facebook page and hit the like button to get the latest update
Facebook page

Follow on
Twitter

Instagram

Google plus

Khajur Or Fried Biscuits

Khajur or khajuria from Bihar.

A quick and easy to make delicious sweet deep fried cookie type snack. You can serve it with milk tea coffee or enjoy on your munching time.

This post is going to be a part of 169 #Foodiemonday bloghop #beginnersrecipe theme.

In this theme we have to share our first recipe we cooked. Thanks Amrita for the suggestion. This theme reminds me of my childhood days. A little girl of class 5th as I remember who didn’t know anything about cooking her naughty younger brother Maa Baba. Missing badly those days. Maa baba brother all left me. Its so painful but your memories are a treasure for me.

In school I remember there was a test of cooking. Every student got some ingredients and a dish name to cook. Everyone had to make different dishes. Teacher asked me to make khajur. And I was shocked, my reaction was ‘what’s that’? That time in my knowledge khajur is a Hindi or Urdu word for date. So how could I cook it? One of my friend came to rescue. She said “don’t worry let me make my dish then I will make your too”. And she made both our dishes. Don’t know where is she now. God bless her. That day I learned my first dish and after returning home made it under my mother’s supervision. And I still remember their surprised faces after tasting it. This week our bloghop group made me really nostalgic.

Now coming to the recipe. You need very few ingredients and quick process to make this delicious crispy sweet snack. Just mix everything and Knead a dough. Shape them and fry. Isn’t easy? 😊

I have used refined flour or maida but you can use whole wheat flour or atta if you want.

Recipe

Refined flour or maida – 1 cup

Semolina or suji – 1/2 cup

Ghee or clarified butter – 3 tablespoon, melted

Cardamom powder – 1/2 teaspoon

Powdered sugar – 1 cup

Desiccated coconut – 1/2 cup

Milk – 1/3 cup or as require to make a stiff dough

Oil for deep frying

Method

1. In a large bowl mix refined flour, semolina or suji, sugar, cardamom powder, desiccated coconut and melted ghee or clarified butter.

2. Mix everything well with your palm and finger tips.

3. Add milk slowly and Knead a stiff dough. Don’t add much or the dough will be sticky. But in case your dough becomes sticky, you can add little more flour and semolina.

4. Make small balls. Shape them with your hands or mould. I have used my sandesh mould. Or you can roll with a rolling pin and cut with your favourite cookie cutter.

5. Heat sufficient oil in a pan. When heated lower the flame.

6. Slide 4 – 5 khajur in the hot oil. Don’t over crowded. Fry the khajur on low heat till golden brown.

7. Flip and fry the other side too. Keep the flame low.

8. Remove from oil and let them cool down completely. After cooling khajur becomes crisp.

9. Keep the khajur in airtight container. You can keep them in room temperature for 10 – 12 days.

10. Serve with milk, tea or coffee.

Notes

1. You can fry the khajur in ghee or clarified butter if you want.

2. If you like less sugar add 3/4 cup powdered sugar.

4. You can add powdered almond or cashew in the dough if you like.

5. You can use whole wheat flour instead of refined flour.

If you tried my recipe, you can share your food pictures with me in the social network sites by using hash tag, #batterupwithsujata
I would love to see your creations.

I would love to hear from you. Please share your thoughts and suggestions in comment.
Please visit my facebook page and hit the like button to get the latest update
Facebook page

Follow on
Twitter

Instagram

Google plus

Date Walnut Fudge Or Barfi

Date walnut fudge or barfi.
One more sugar free sweet for you.
No artificial sweetener added. Sweetened with date.
You can make this yummy and guilt free sweet as a Diwali treat for your friends or guests.

Sending this post to A to Z challenge, a challenge initiated on Facebook Group, created by Jolly and Vidya.
Wherein a group of bloggers come together and we choose key ingredients alphabetically to cook and post a dish every alternate month. This month’s Alphabet is D. And my humble contribution is this delicious and healthy date walnut fudge or barfi.


You may like some more sugar free sweet recipes. Click on the name below to get the recipe.

1. Coconut raisin almond laddu

2. Sugar free mawa nariyal peda

3. Sugar free pineapple sandesh

4. Sugar free mango coconut laddu

5. Sugar free date sandesh

6. Sugar free sheer khurma

7. Sugar free carrot bottle gourd fudge

8. Sugar free carrot cake

Dates are not only delicious but they are also very nutritious. They are good source of various vitamins, calcium, minerals, fiber, antioxidants etc. And dates have the potential to help regulate blood sugar due to their low glycemic index.

I have used walnut in it.
Walnuts are round, single-seeded stone fruits that grow from the walnut tree. They are a good source of healthful fats, protein, and fiber. They may enhance heart and bone health and help in weight management, among other benefits.
The possible health benefits of walnuts may include boosting the cardiovascular system and bone health, reducing the risk of gallbladder disease, and treating epilepsy.
Read more about health benefits of walnut here.

These fudge are very easy to make. I have used only 3 ingredients to make it. And sprinkled little almond to garnish. I have used homemade khoya or dried milk/milk solid, you can also use store bought. If you are using store bought mawa or dried milk just grate before using.

Recipe

Khoya/mawa or dried milk/milk solid – 1 cup

Dates – 1/2 cup, chopped

Walnut – 1/3 cup, finely chopped

Shredded almond to garnish

Method

1. Grease a plate with oil or ghee/clarified butter or butter.

2. Soak the chopped dates in hot water. Add water just to soak dates. Don’t add much.

3. Let it cool down.
Mash the soaked dates with a spoon or hand.

4. Mix khoya/mawa or dried milk, soaked and mashed dates and chopped walnut.

5. Heat a nonstick pan or heavy bottom pan.

6. Add the mixture and cook on low flame till the mixture lightly change it’s colour and leaves the sides.

7. Remove from heat.
I didn’t add any flavour because I wanted to retain the aroma of dates but if you want you can add 1/2 teaspoon cardamom powder or rose water and mix well.

8. Transfer the mixture into the greased plate.

9. Spread and level with a spatula.

10. Sprinkle shredded almonds and press gently with the spatula.

11. Keep in refrigerator to set for 15 – 30 minutes.

12. Cut into your desired shape.

Enjoy the guilt free dessert on this festive season.

Note

If you want more sweetness then you can add little more soaked dates.

If you tried my recipe, you can share your food pictures with me in the social network sites by using hash tag, #batterupwithsujata
I would love to see your creations.

I would love to hear from you. Please share your thoughts and suggestions in comment.

Please visit my facebook page and hit the like button to get the latest update
Facebook page
Follow on
Twitter

Instagram

Google plus