Whole Wheat Coconut Cookies 


Merry Christmas to everyone. May the light of Christmas give you peace and happiness.


Eggless whole wheat flour coconut cookies.

Traditionally Christmas cookies are sugar cookies. I wish I could share a traditional sugar cookies. But I am outstation for a long time. So this time sharing the recipe from my archive.
Sending this post to the 124th #Foodiemonday bloghop #Christmas recipe theme.

You can get some more eggless cookies recipes here.

Finger millet oats chocolate cookies

Choco chips cookies with coconut oil

Pearl millet cashew almond honey cookies 

Cocoa almond cookies

Oats almond jaggery cookies

Red velvet choco chips cookies

Date palm jaggery oats dry fruits cookies

Pearl millet sesame oats cookies

Finger millet chocolate crinkle cookies

Orange crinkle cookies

Vanilla chocolate chips cookies

Sugarless dates and oats cookies 

Choco chips cookies

Malai or milk topping cookies

Pinwheel cookies

Nankhatai or shortbread cookies

Coconut cookies


I have used cardamom in this coconut cookies , if you don’t like cardamom you can use vanilla or any flavour of your choice.


Recipe


Whole Wheat flour or atta – 1 cup

Baking powder – 1/2 teaspoon

Baking soda – 1/4 teaspoon

Cardamom powder – 1/2 teaspoon

Dessicated coconut – 1/2 cup

Powdered sugar – 1/3 cup

Coconut oil or Ghee/clarified butter or butter – 1/2 cup

Milk – 4-5 teaspoon

Method


Preheat the oven at 180°.

Grease a baking tray or line with parchment paper or aluminium foil.

Spread some dessicated coconut on a plate.

In a bowl sift flour, baking powder, soda and cardamom powder. Mix dessicated coconut in it.

In a bowl cream powdered sugar and coconut oil or ghee/clarified butter or butter. I have used coconut oil. Whisk well.

Add all the dry ingredients. Mix well.

Add milk gradually to make a smooth dough.

Make small balls. Roll on the dessicated coconut. You can press gently. If you want flat cookies.

Arrange the cookies on the baking tray.

Bake at 180° for 12 – 15 minutes or until the cookies become light golden brown.

Let the cookies cool down completely before serving.

Serve with tea or coffee. Or store in airtight container for later use.

Enjoy…..

Happy baking 😊

Notes


1. If you don’t like cardamom flavour, you can use vanilla or any flavour of your choice.
2. You can use refined flour or maida instead of whole wheat flour. Or use 1/2 cup whole wheat flour and 1/2 cup refined flour.

I would love to hear from you. Please share your thoughts and suggestions in comment.

Please visit my facebook page and hit the like button to get the latest update.

Facebook
Stay connected at

Twitter

Instagram

Tomato Coconut Chickpea Curry 

Tomato coconut chickpea curry.

A delicious dry curry without onion. Fresh coconut, tomato, garlic and some spices makes the curry flavourful and lip-smacking.

My mom used to make this curry with only tomato and garlic. She rarely used onions and the taste was awesome. Today I have followed her recipe but added fresh coconut too.

If you don’t have coconut you can omit it. Sometimes I also make it without coconut. With or without both are delicious. Or you can make it without garlic too. Use only tomato, ginger, coconut, green chilli and spices. You can use lemon juice instead of dry mango powder or use both if you like tangy curry.


Recipe


Chickpea – 1 cup

Green cardamom – 3

Clove – 3

Cinnamon – 1 inch piece

Bay leaf – 1

Salt to taste

Turmeric – 1/2 teaspoon

Ginger – 1 inch piece

Garlic – 4-5

Green chilli – 2 – 3

Tomato – 4 medium, chopped

Grated fresh coconut – 2 tablespoon +1 tablespoon, optional

Cumin powder – 1 teaspoon

Coriander powder – 1 teaspoon

Kashmiri red chilli powder – 2 teaspoon

Cumin seeds – 1/2 teaspoon

Oil – 2 tablespoon

Amchur or dry mango powder – 2 teaspoon

Cilantro or coriander leaves 2 tablespoon + to garnish

Method


Soak the chickpea overnight.

Crush the cardamom, cinnamon and cloves in a mortal pastel.

Boil the overnight soaked chickpeas with green cardamom, cloves, cinnamon, bay leaf, salt and water.

Discard bay leaf and keep aside.

Grind tomatoes, green chilli, garlic, ginger and 2 tablespoon grated fresh coconut. Make a smooth paste.

Heat oil in a pan. Add cumin seeds and let them splutter.

Now add the ground mixture, turmeric powder, cumin powder, coriander powder and kashmiri red chilli powder.

Saute till oil leaves the side.

Add boiled chickpeas, 2 tablespoon cilantro or coriander leaves and salt. Add salt carefully. We have added salt while boiling the chickpeas. Mix well.

Add remaining water of boiled chickpeas.

Stir and cook on low flame for 10 minutes or until the water absorbed.

If you want thick gravy add little more water. I have made dry curry.
Add dry mango powder and mix well. If you don’t have dry mango powder you can use lemon juice. Or use both if you like tangy taste.

Taste and adjust salt. If you like you can add little more dry mango powder or lemon juice.

Garnish with chopped cilantro or coriander leaves and grated coconut.

Serve with paratha, puri, naan, roti or Indian flat bread or any bread.

Notes


1. Add chilli according to your taste. If you  like hot add more chilli.
2. You can add 1-2 tablespoon lemon juice if you like your curry tangy.
3. If you don’t like garlic you can omit it.

4. If you like the taste of coconut and want to make it without garlic, you can add 1/4 to 1/2 cup fresh grated coconut.


I would love to hear from you. Please share your thoughts and suggestions in comment.

Please visit my facebook page and hit the like button to get the latest update.

Facebook page

Stay connected at

Twitter

Instagram

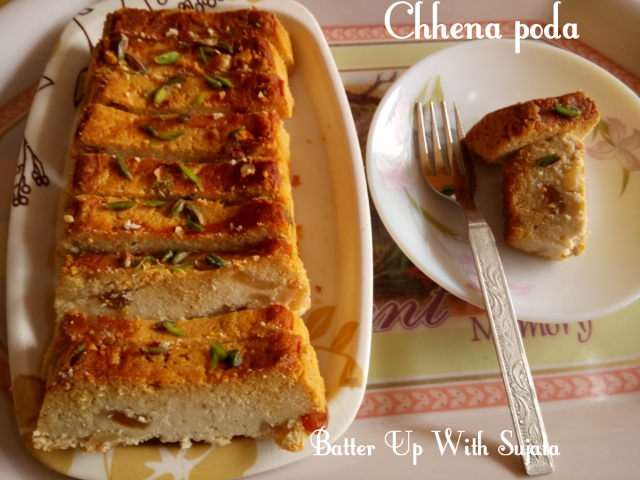
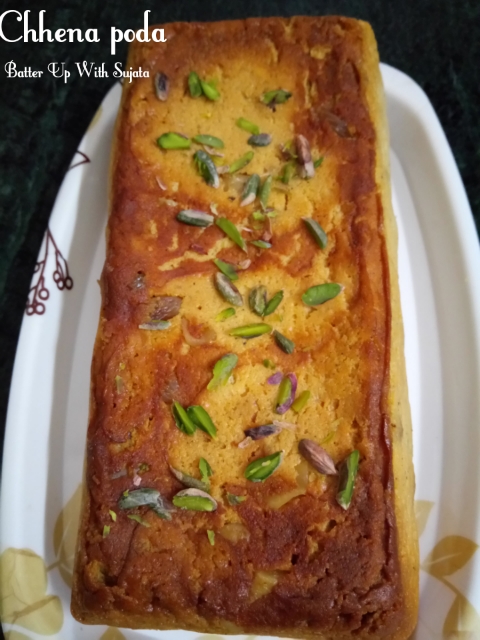
Chhena Poda Or Baked Cottage Cheese 

Chhena poda or baked cottage cheese cake.

Yes a cake but you don’t need flour or baking powder to make it.

Chhena poda is a dessert made of cottage cheese from Odisha. Its literally means roasted cheese in Odia language.

Its a very delicious baked dessert, made of fresh cottage cheese or chhena/paneer sugar, cardamom, cashew nuts and raisins. Flavour of cardamom and caramelised sugar made this dessert heavenly.

This week’s 122nd #Foodiemonday bloghop theme is #Odiacuisine.

My contribution is this delicious chhena poda. Adopted the recipe from my fellow blogger and a dear friend Alka Jena who blog at

Culinaryxpress

Visit her blog for many amazing recipes. Thanks Alka for the suggestions.

To make this chhena poda or baked cottage cheese better use homemade fresh cottage cheese or paneer. Its very easy to make. Just blend cottage cheese, sugar, cardamom powder, little milk or whey, cashew nuts and raisins till smooth and bake with caramelised sugar syrup.

Recipe
Paneer or cottage cheese – 2 cup, crumbled

Sugar – 1/2 cup + 2 tablespoon

Cardamom powder – 1 teaspoon

Cashew nuts – 2 tablespoon

Raisins – 2 tablespoon

Milk or whey – 4 tablespoon

Ghee or butter for greasing

Sugar for caramelization

Pistachio to garnish


Method


1. Preheat the oven at 180°.

2. Fry cashew nuts and raisins lightly.

3. Blend paneer or cottage cheese, sugar and cardamom powder. Mix well.

4. Add milk or remaining whey of paneer. Blend till the mixture becomes smooth. Taste and adjust sugar if required. I like less sweet.

5. Add fried cashew nuts and raisins. Mix well.

6. Grease a baking pan with ghee or butter. Spread 1 tablespoon sugar and heat the pan till sugar caramelise.

When sugar caramelised switch off the flame.

7. Tilt the pan to spread the caramelised syrup all over the base.

8. Pour the paneer mixture over it.

Spread evenly with a spoon or spatula.

9. Bake in a preheated oven at 180° for 35 – 45 minutes.

10. To check insert a toothpick in the middle. If the toothpick comes out clean chhena poda is ready.

11. Take out the pan when hot and invert it on a plate to take out.

If it becomes cold sugar syrup at base will be hard and it will be difficult to come out intact.

12. Garnish with pistachio. Serve delicious chhena poda or baked cottage cheese hot or cold.

I would love to hear from you. Please share your thoughts and suggestions in comment.

Please visit my facebook page and hit the like button to get the latest update.

Facebook page

Stay connected at

Twitter 

Instagram

Flavoured American Biscuit 

Flavoured American biscuit.

First time tried these biscuits and love the texture and taste.  So tried again with lightly flavoured with Italian herbs. You can enjoy these savoury biscuits with jam or gravy.

A biscuit in the United States and parts of Canada, is a variety of small baked goods with a firm browned crust and a soft interior. They are made with baking powder or baking soda as a chemical leavening agent rather than yeast. They are similar to British scones or the bannock from the Shetland Isles.

Biscuits, soda breads, and cornbread, among others, are often referred to collectively as “quick breads,” to indicate that they do not need time to rise before baking.

Wikipedia


First time I saw these biscuits in a food group. And tempted to try it. Thanks to Pat Clark Royalty, Nathalie Dupree and Rosie Dore for the great help. You introduced me to these delicious biscuits. Everyone in my family loved these.

Adopted the recipe from Geniuskitchen.com

Recipe is very easy and simple. Refined flour is used in it. But next time I will try with whole wheat flour. I have made these with lightly flavoured. If you like you can increase the amount of herbs for strong flavour. See notes for it.

Recipe


All purpose flour or maida – 2 cup

Baking soda – 1/4 teaspoon

Baking powder – 1 tablespoon

Salt – 1 teaspoon

Unsalted butter – 6 tablespoon, chilled

Butter milk – 1 cup

Garlic powder – 1 teaspoon

Origano – 2 teaspoon

Red chilli flakes – 1/2 teaspoon

Method


1. Preheat your oven at 180°.
2. Combine all purpose flour, salt, baking soda, baking powder, garlic powder, origano and red chilli flakes in a bowl.
3. Cut the butter into chunks and mix it into the flour with your fingers until it resembles course meal.

If using a food processor, just pulse a few times until this consistency is achieved.
4. Add the buttermilk and mix just to combined.

If you feel the mixture dry add a bit more buttermilk. It should be very wet.
5. Turn the dough out onto a floured board.
6. Pat very gently. (according to original recipe it should not be  rolled  with a rolling pin) but I have used rolling pin. Next time I will follow as directed in the original recipe. Pat or roll the dough out until it’s about 1/2″ thick. Better don’t use rolling pin.
7. Fold the dough about 5 times, gently press the dough down to a 1 inch thick.
8. Use a round cutter to cut into rounds.

Don’t twist, cut the biscuits directly down.
9. You can gently knead the scraps together and make a few more, but they will not be anywhere near as good as the first ones.
10. Place the biscuits on a cookie sheet, if you like soft sides, put them touching each other.

If you like crusty sides, put them about 1 inch apart- these will not rise as high as the biscuits put close together.
11. Bake for about 10-12 minutes- the biscuits will be a beautiful light golden brown on top and bottom.

Do not overbake.

Notes –

1. Handle the dough gently. Don’t knead much.

If you have food processor you can use it.
2. If you want fresh biscuits you can cut the dough and place on a cookie sheet and freeze. Bake for 20 minutes when required.
3. Now I am copy pasting the words as Pat Clark Royalty directed to make these –

Remember: cut to pea like consistency. Pat to oblong. Fold into thirds. Pat again. Fold again. Cut biscuits directly down. Don’t twist the cutter. Done. Don’t make too thin.

Leftover: split, butter, cut side down in hot pan to brown.

Thanks again for these useful tips.
4. If you don’t have buttermilk mix 3/4 cup curd and 1/4 cup water or mix 1 tablespoon vinegar or lemon juice in 1 cup milk, keep aside for 5 – 10 minutes to get the perfect buttermilk.
5. If you want strong flavour use 2 teaspoon garlic powder and 1 tablespoon origano. Add chilli flakes according to your taste.

6. My Indian readers if you make the dough soft and smooth not wet and roll out thin then it will be just like khasta mathri like snack. You can try if you like.

Get the original recipe here.
I would love to hear from you. Please share your thoughts and suggestions in comment.

Please visit my facebook page and hit the like button to get the latest update.

Facebook page

Stay connected at

Twitter

Instagram 

Manipuri Tan Or Flat Bread With Finger Millet Or Ragi Flour 

Manipuri tan or flat bread with finger millet or ragi.

A very healthy  breakfast. Perfect dish to start your day.
Ragi or finger millet is a powerhouse of nutrition and act as a treatment for anaemia, diabetes, osteoporosis and brittle bones.
Ragi  is packed with iron, protein, calcium etc. Fiber rich finger millet helps to lower cholesterol level and its an ideal food for weight loss.
Ragi is gluten free and suitable for gluten or lactose intolerant people. Not only that it also helps in relieving stress and anxiety.

Monday again and time for our 121st #Foodiemonday bloghop. My fellow blogger and a dear friend Pushpita who blog at https://pushpitaschakhum.wordpress.com is not participating due to health reason. God bless her with good health and happiness. Wishing her a very speedy recovery.

So this week we are sharing recipes from her wonderful blog. Do visit her blog for many amazing recipes. We introduced each other on a discussion over black rice. Remember Pushpita? After that you are always very helpful and becomes a dear sister to me 😍 

Now look what Pushpita has written about ragi or finger millet. 

“In the Northeast, farmers or traditional millet growers weren’t aware of the commercial value of millets that were cuitivated or that grow in wild. The reason being most of the communities growing millets for cattle fodder, or for brewing local wines considering it as a minor crop. Few communities do eat millets either mixed with rice so that an entire family has enough to eat, or perhaps knowing about its nutrition value.”

Coming to the recipe. Garlic chives are used in this flat bread. But I don’t have garlic chives so I made it without it. If you have you can add. I have used green chilli and cilantro or coriander leaves in it and served with homemade ginger pickle. 

Recipe


Finger millet or ragi flour – 1 & 1/2 cup

Rice flour – 1/2 cup

Salt to taste

Grated ginger – 1 teaspoon

Cilantro or coriander leaves – handful, chopped

Green chilli – 1 – 2, finely chopped

Hot water – 1 & 1/2 cup or as require

Oil for shallow frying

Method


1.In a large mixing bowl add the ragi flour, rice flour and salt.

2.Pour in the hot water and mix propely with a spoon.

If you want a pliable dough to roll out with rolling pin add 1 cup water first. Add little more if require. 

 Add the chopped green chilli and cilantro and fold in gently. Set aside to let cool.

3. Grease both palms with some oil and mix the flour to a smooth dough.

4.Divide the dough into equal size portions. Roll them between both palms to round shapes and keep aside.

5.Sprinkle some ragi flour on a flat platform or rolling board and shape each dough portion to a round shape evenly with your hand or rolling pin. 

6.Heat a pan or tawa (preferably cast iron) and place the flattened dough with the floured side on top.

7.Flip the tan or flat bread after a minute. Drizzle few drops of oil by slightly lifting the tand cook the other side.

8.Drizzle little oil on the top side and flip and cook for a minute.

Serve hot with ginger pickle or any pickle or sauce. 

For ginger pickle mix ginger julienne, chopped green chilli and black salt. Soak all these in sufficient lemon juice. Store in a clean and dry jar. Keep under sun light for 6 – 7 days. Your pickle is ready.

Start your day with this healthy breakfast.
Notes 

1. You can use garlic powder or grated garlic or paste if you like garlicky taste. 

2. Add chilli according to your taste. 

3. You can add 1 teaspoon lemon juice in the dough if you like. 

I would love to hear from you. Please share your thoughts and suggestions in comment. 

Please visit my facebook page and hit the like button to get the latest update. 

Facebook page

Stay connected at 

Twitter 
Instagram