Moong dal bhaja/fried and baked pithe.
A deep fried delicacy from Bengal. Mildly sweet and spicy outer layer made of moong dal or yellow lentil and coconut and date palm jaggery or khajur gur stuffing. Interesting isn’t it 😊
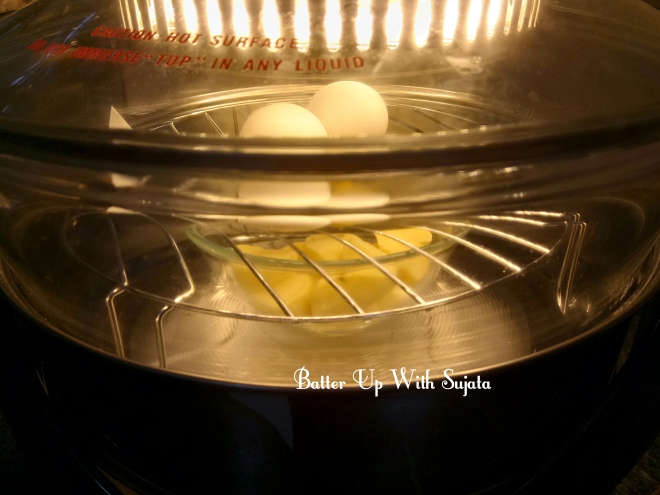
Usually it should be deep fried but I have also baked it to make it guilt free. Sharing both methods. I have baked these in halogen oven but you can use your microwave convection mode or OTG to bake.
I remember my mother used to make different types of pithe puli on sankranti. Like bhapa or steamed pithe, ranga aloor/sweet potato pithe, gokul pithe, nolen gur paesh or kheer, green peas stuffed potato or aloor nonta/salty pithe, patishapta, dudh puli, narkol nadu or coconut laddu, malpua and this moong dal bhaja pithe. On sankranti day these was our dinner. I have made all the pithe except this bhaja pithe. It was my most favourite but I can’t remember the exact recipe. Only remember the mildly spicy and lip-smacking taste and some ingredients. My mother is no more so now whom to ask.
In a facebook group Swati Chatterjee Mookherjee posted this. So I have asked her about the recipe. And she gave me her mom’s recipe. Tried it and got the same taste of mom made pithe. Thanks Swati and a big thank to your mother.
Only difference is in her recipe she used green chilli but I remember my mother used red chilli powder. So I have used red chilli powder instead of green chilli paste. If you want you can use paste of 1 – 2 green chilli or black pepper powder instead. As I mentioned above this pithe taste better next day.
You can get some more sankranti delicacies on this blog.
Sending this post to 182 #Foodiemonday bloghop Down memory lane theme. This beautiful theme suggested by our bloghop member Swaty Malik who blog at Food Trails.
Do visit her space for some delicious recipes.
Down the memory lane yes this pithe is perfect for the theme. It was my childhood favourite. After a long time got the same taste. I have used 1/2 teaspoon red chilli powder to make it mildly spicy but if you want to make it more spicy, then you can add 3/4 to 1 teaspoon red chilli powder.
I have fried half of the pithe and baked remaining half. Baked version is also too good. Loved both the version fried and baked.

Recipe
For stuffing
Coconut – 1 cup, grated
Mawa/khoya or dried milk – 3/4 cup
Date palm jaggery or khajur gur – 1/2 cup
Cardamom powder – 1/2 teaspoon
For outer layer
Moong dal or split yellow lentil – 1 cup
Ghee or clarified butter – 1 tablespoon
Ginger paste – 1/2 teaspoon
Red chilli powder – 1/2 teaspoon
Salt – 1/4 teaspoon
Water – 2 & 1/2 cup or as require
Date palm jaggery or khajur gur – 1/2 cup, grated
Rice flour – 3 tablespoon
Oil for frying
Method
1. Heat a nonstick or heavy bottom pan. Add coconut, mawa/khoya or dried milk and date palm jaggery or khajur gur. Mix well.
2. Cook on low heat, stir continuously to avoid sticking to the bottom.
3. When the mixture dried up and becomes like a dough remove from heat. Add cardamom powder and mix. Stuffing is ready. Let it cool down.

4. Rinse the lentil well. Spread on a plate or paper towel for 30 minutes.
5. Heat ghee or clarified butter in a pan. Add the lentils.
6. Fry the lentils till fragrant and change it’s colour to light golden brown.
7. Add salt ginger paste and red chilli powder. If you want more spicy add 3/4 to 1 teaspoon red chilli powder.
8. Mix well and add water. Let it cook on low flame till the lentils becomes soft. You can add more water if require.
9. Add jaggery and mix. Cook until jaggery melted and the mixture dried up. Remove from heat.
10. Let the mixture cool down. Add rice flour gradually and mix.
11. Mix well and knead into a smooth dough. You can add 1 tablespoon more rice flour if require for binding but don’t add more than it.
12. Make small balls. Flatten the ball with your palm and place one teaspoon full stuffing in the middle.
13. Bring the edges together and make a ball again. Give the balls cylindrical shape.


14. Heat sufficient oil for deep frying. Oil should be enough hot.
15. Slid the cylindrical pithe in the oil reduce the flame and fry on low medium heat till golden brown from all the sides.
16. Remove from oil and place on paper towel. These taste best next day.
Baked method
For halogen oven
1. Brush all the pithe with oil. Place on the nonstick baking tray or plate which you got with oven.
2. Press speed up mode and set the temperature 200°. Set the timing 10 minutes. Press start to bake.
3. Bake for 8 – 10 minutes or till pithe becomes golden brown. Keep an eye after 8 minutes. Mine takes 10 minutes to bake one side and 8 minutes after turning.
4. Bake for 8 – 10 minutes or till pithe becomes golden brown. Turn over and bake other side too in this method.

For microwave convection mode or OTG
1. Preheat the at 200° for 10 minutes.
2. Bake at 200° for 8 – 10. Or until pithe becomes golden brown. Keep an eye after 6 minutes. Every oven takes different time.
Serve warm or cold. It will taste better next day. Enjoy…….
Notes
1. Instead of red chilli powder you can use green chilli paste or black pepper powder.
2. You can drizzle date palm jaggery syrup over the pithe just before serving.
If you tried my recipe, you can share your food pictures with me in the social network sites by using hash tag, #batterupwithsujata
I would love to see your creations.
I would love to hear from you. Please share your thoughts and suggestions in comment.
Please visit my facebook page and hit the like button to get the latest update
Facebook page
Follow on
Twitter